ClientTrack System Administration Guide
ClientTrack System Administration Guide
Table of Contents
INTRODUCTION
System Administration Guide Introduction
This Administrator Guide provides ClientTrack Administrators with the detailed information necessary to perform their standard day-to-day functions and tasks in ClientTrack. The terminology and screenshots used in this Administrator Guide are taken from ClientTrack's baseline functionality.
Two ClientTrack Environments
Although some ClientTrack Administrators may have access to additional databases, all should have access to the two detailed below after ClientTrack implementation.
Training Environment
Your Training Environment (which generally includes _train at the end of the environment's URL) is where the service delivery team will construct your new implementation. All demonstrations of features and functionality during ClientTrack's implementation will be given out of the Training Environment. Your Users will be given accounts to the Training Environment and provided training on the new system per the terms of your contract. The
Training Environment never goes away and, as such, continues to be a valuable resource to your organization.
As you bring on new staff members, they can utilize the Training Environment to familiarize themselves with your system without risking the data purity of the Production Environment. As new opportunities to utilize ClientTrack within your organization are identified, these changes will be implemented first in the Training Environment. This will allow you to play with, test, and verify any new changes without creating any downtime for your Production Environment.
Production Environment
Your Production Environment is where all actual data will be stored. While fake and scenario-based data can be entered into the Training Environment, the data in your Production Environment should only consist of existing client and transactional records. Your Production Environment will generate all reports on outcomes and other metrics. As such, it is essential to follow two guiding principles:
- Verify that Users of the Production Environment have sufficient training to do so.
- Avoid making functionality changes directly to the Production Environment. Untested changes may have the unintended consequence of crippling access to a specific form or workflow, preventing Users from completing their duties in the environment. All changes to the Production Environment should be made to the Training Environment, thoroughly tested, and then brought forward into the Production Environment through a Configuration Sync.
HIPAA Compliance
In terms of data security, All ClientTrack software is fully compliant with the Technical Safeguards standards as outlined in the Health Insurance Portability and Accountability Act (HIPAA) Security Rules. Additionally, ClientTrack software enables customers to maintain full compliance with all Administrative Safeguards and provisions within the Security and Privacy Rules of HIPAA.
ClientTrack software includes technical safeguards designed to ensure that information is maintained and transmitted securely. Additionally, ClientTrack software provides comprehensive capabilities to implement flexible security and access control policies based on customer needs and information security policies.
ClientTrack software is unique in that data accessibility can be determined through the standard Memoranda of Understanding (MOU), individual client sharing preferences, and even individual client preferences. ClientTrack software can genuinely meet any customer’s need for an appropriate security and access control model.
Eccovia Responsibilities
Data integrity is at the very core of what Eccovia offers, and it is our top priority to ensure your clients' personal information is kept secure. We take the following steps to make this possible:
- Actively monitoring security practices to ensure customer data is managed according to established best practices.
- Supporting the escalation and security needs of our customers.
- Reporting as required in accordance with the HIPAA Omnibus Rule.
Customer Responsibilities
ClientTrack enables organizations to maintain full HIPAA Compliance. However, it is within our client’s responsibility to take reasonable care to maintain data confidentiality. These actions include, but are not limited to:
- All User accounts should be in the full name of the said user instead of generic roles like "Administrative Assistant" or “Case Manager.”
- Paper or electronic records (including records stored on hard drives or other electronic media) containing covered information should be disposed of properly.
- Users should be prohibited from leaving their workstations “logged-in” or keeping open paper materials and files containing covered information on their desks when they are not at their desks.
- At the end of the workday, all files and other records containing covered information should be secured in a manner consistent with protecting personal information security.
- Users should be encouraged to report any suspicious or unauthorized use of covered information.
System Administration
System Properties
The system properties page allows ClientTrack Administrators to control specific systemwide settings in their ClientTrack environment. Each property is listed with help text in the Description column that can be accessed by moving your mouse over the icon.
Navigating to System Properties
System Properties are managed by going to the Home Workspace, Global Administration Menu Group, then the System Administration Menu Group, and finally selecting the System Properties Menu Option.
Notable System Properties
| Login Attempts |
The number of incorrect log-in tries the User will have before being locked out of the environment. |
| Lock-out Time |
Controls the time (in minutes) that a User will be locked out of the environment once they have reached the specified number of failed log-in attempts. |
| Password Expires After X Days |
The "X" is the number of days after the User will be forced to change their password. Please note a "0" (zero) will disable the password expiration function. |
| Password Expiration Warning |
The number of days prior to the required password change that the environment will notify the User. |
| User Account Expiration |
The number of days of inactivity on a User’s account before the environment will automatically disable the account. |
System Update History
The System Update History provides ClientTrack Administrators information about when their environment was updated and the details of that update. Updates include changes to the ClientTrack application or synchronizations (e.g., from your Training Environment to your Production Environment.) For more about synchronizations, please see the Configuration Syncs section.
System Update History lists out all of the updates to your solution. Several search options on the top of the screen allow you to filter by date or specific update. You can also choose to Exclude Environment Synchronizations or only Show Items with Release Notes by checking their corresponding checkbox.
You can also view the Release Notes for each item by selecting the blue hyperlink next to the corresponding system update. This is also a feature that allows you to verify whether or not a sync has taken place as scheduled if needed.
USER MANAGEMENT
User Management
Accessing User Management
To access the User Management Menu Option, ClientTrack administrators will need access to a Workgroup with the Global Administration or Setup Data Management Menu Group in combination with the Write Permission setting for User Setup under their Tool Access Permissions.
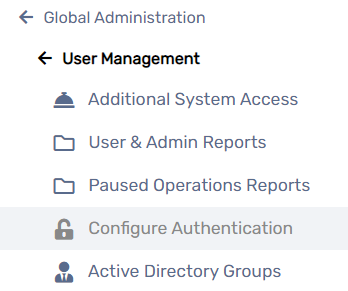
Click the Global Administration menu group, then select User Management.
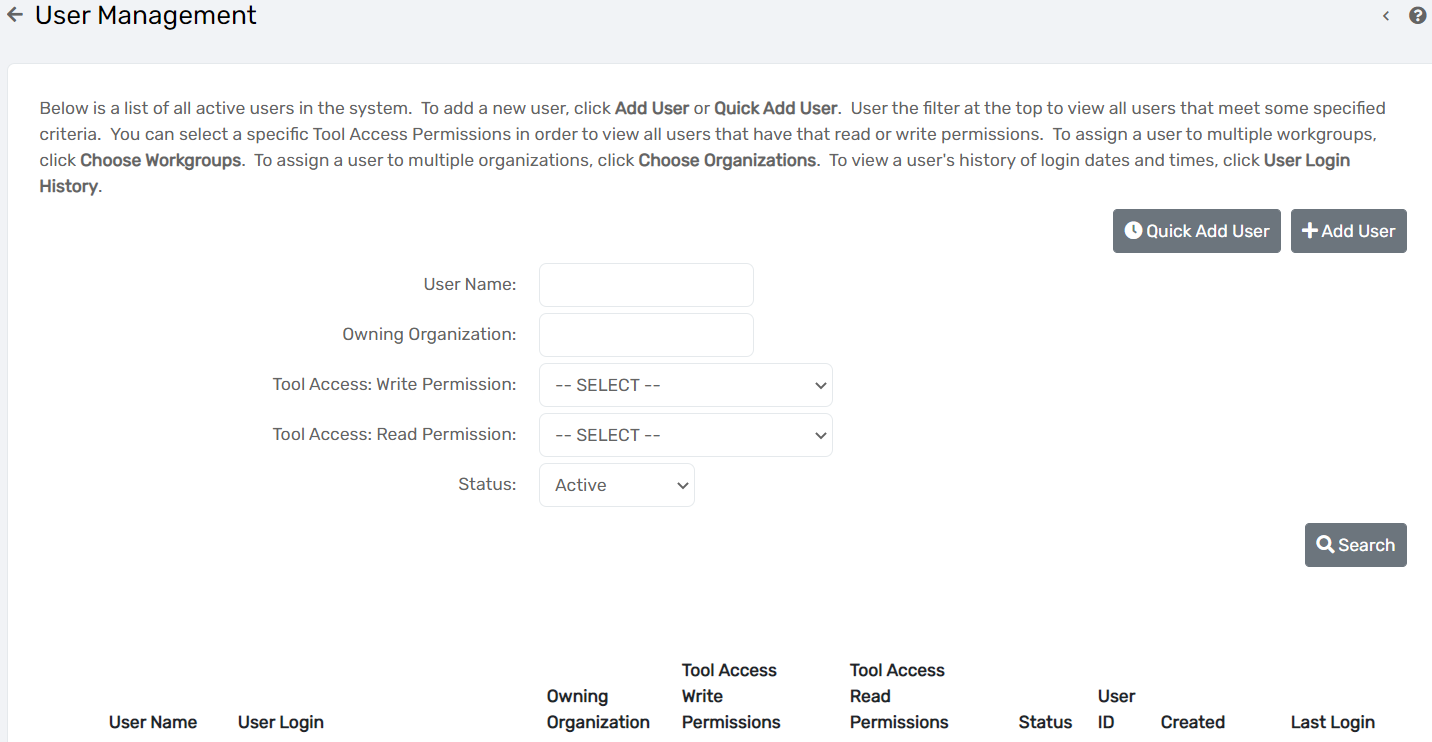
The default setting for the User Management search form is to display a list of only the active user accounts in your system. The search form allows administrators to filter the list results by User Name, Owning Organization, Status (active or inactive), and Tool Access Permissions.
Adding a New User
Adding a New User
Navigation
Access Path: Home > Global Administration > User Management

New users can be added by clicking Add User or Quick Add User at the top of the User Management form. The Quick Add User form is a modified version of the in-depth user setup form outlined below.
- Click Add User.
- Enter the full name of the user in the Name field, then enter their Email/Login Name.

Please Note: Each email address must be unique, as this is also used for the user’s login name. |
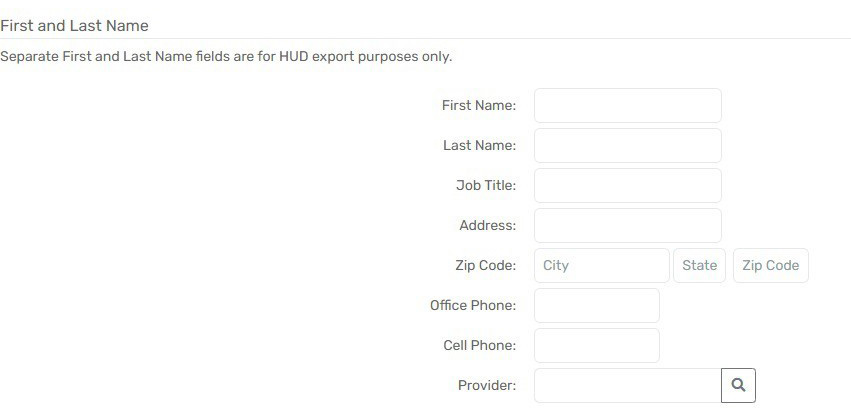
- Enter the Job Title, Address, and Phone, associated Provider, if applicable.
Associating a User to a Provider will allow certain Referral forms to preset specific Provider fields for the User.
- Select the Owning Organization. Owning Organization is the primary Organization whose Client data the user will be accessing.
- The Location field is optional and used as the default location when the user signs in.
- Identify the user’s Supervisor if you wish to have the user appear on their supervisor’s My Team form.
- The Case Manager checkbox is used to indicate whether this user is listed as available for case assignments or not.

- Select the Workgroup this user will need to access. In contrast, Organizations determine which data the user can access, whereas Workgroups control what functionality the user can access.

- For a user to access their account, the Active Status must be marked as Active. Inactive or Pending will not allow the user to log in.

| Please Note: When a user should no longer have access to a ClientTrack instance, administrators should mark the user with an Inactive Status rather than deleting the user. Deleting a user may negatively affect any transactional or assessment data that the user may have entered or updated. |
- Complete the Tool Access Permissions for the user. More information on Tool Access Permissions can be located in the next section.
- Enter a User Password. A User Password must follow the criteria listed on the form below. The password is verified by re-typing it into the Confirm Password field.
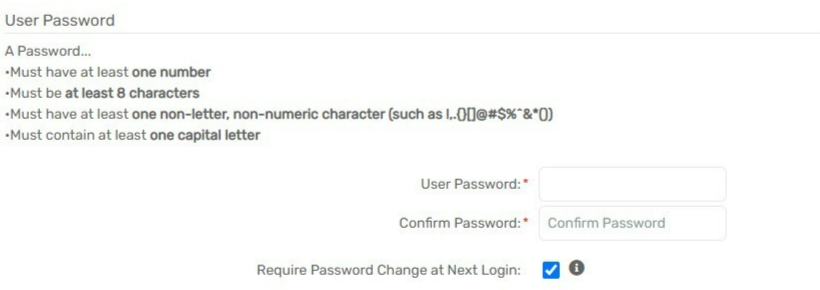
The administrator sets a generic password for the user and leaves the Require Password Change at Next Login checkbox selected.
On the user’s first log-in using the generic password, ClientTrack will prompt them to immediately change their password to one of their choosing. The only time it is not necessary to require a user to change their password is in a Training environment.
Password retrieval is accomplished using a Security Question and Answer combination. As the administrator, you can leave this field blank so that users are prompted to complete this information to activate password recovery options. While editing a user account, administrators are unable to view security answers or password information.

| Administrators should encourage users to complete their Security Question and Answer during their first log-in into ClientTrack. This will allow users to not be reliant on an administrator to reset their password. |
- Use the Support Issues Capability section at the bottom of the form to determine how this user can interact with the Issue System. ClientTrack includes a built-in issue support system. The options are as follows:
|
Unable to Submit Support Issues |
The user is not able to access the Issue Submission form in ClientTrack. |
|
Able to Submit Support Issues Internally |
As a best practice, most users are assigned this setting, allowing them to submit their issues, questions, and suggestions to an administrator. The administrator should attempt all known options to resolve all submitted issues and questions before submitting remaining items to the Eccovia Support Team. |
|
Able to Submit Support Issues to ClientTrack |
Users with this setting assume the role of transmitting requests directly to the Eccovia Support Team. As mentioned above, this option is best limited to administrators, who have control over which issues are authorized to be submitted to the Eccovia Support Team. |
Tool Access Permissions
Tool Access Permissions
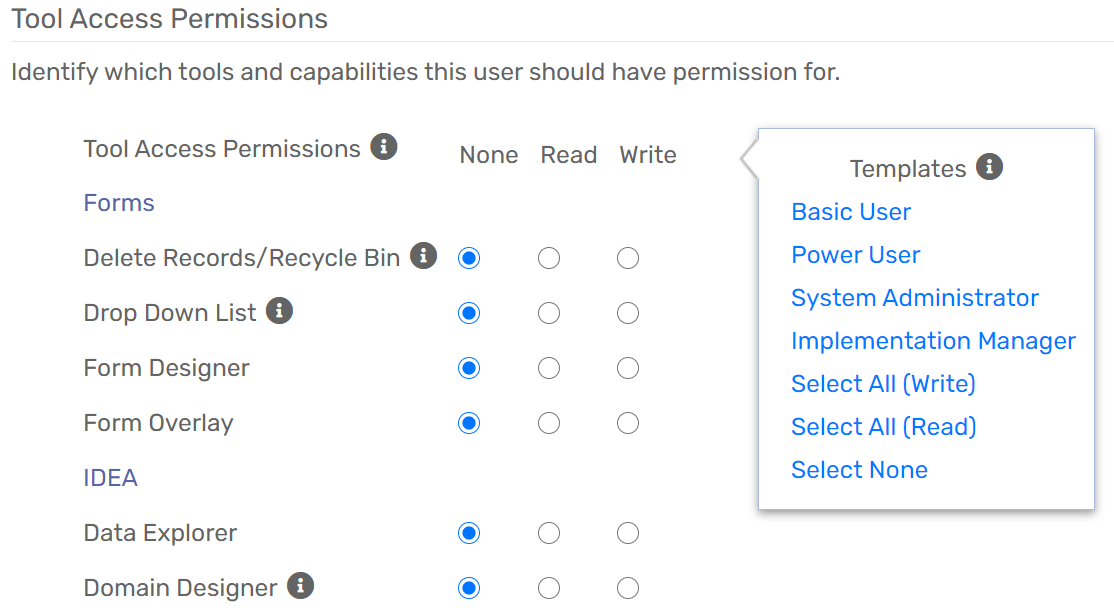
Tool Access Permissions determine which features and capabilities the user can access. Administrators commonly utilize one of several pre-set Tool Access Permissions templates to quickly identify the type of user and which permissions they are assigned. Available Tool Access Permissions Templates:
| Basic User | doesn’t allow a user access to edit any data or functionality of any kind |
| Power User | allows a user access to intermediate administrator features like Query Designer, User Management, and Case Note Templates |
| System Administrator | allows user access to advanced administrator features, allowing for extensive Write access throughout the ClientTrack instance. This access should be limited to those who have had the necessary training |
| Implementation Manager |
allows user full access to Design-level features, allowing for full Write access throughout the solution with the ability to physically modify and edit functionality. This access is limited to those who have completed comprehensive designer training overseen by an Eccovia employee |
You can also manually select permissions. If you choose to do so, please utilize the detailed chart in the Appendix: Tool Access Permissions.
Managing a User’s Organization Access
Managing a User’s Organization Access
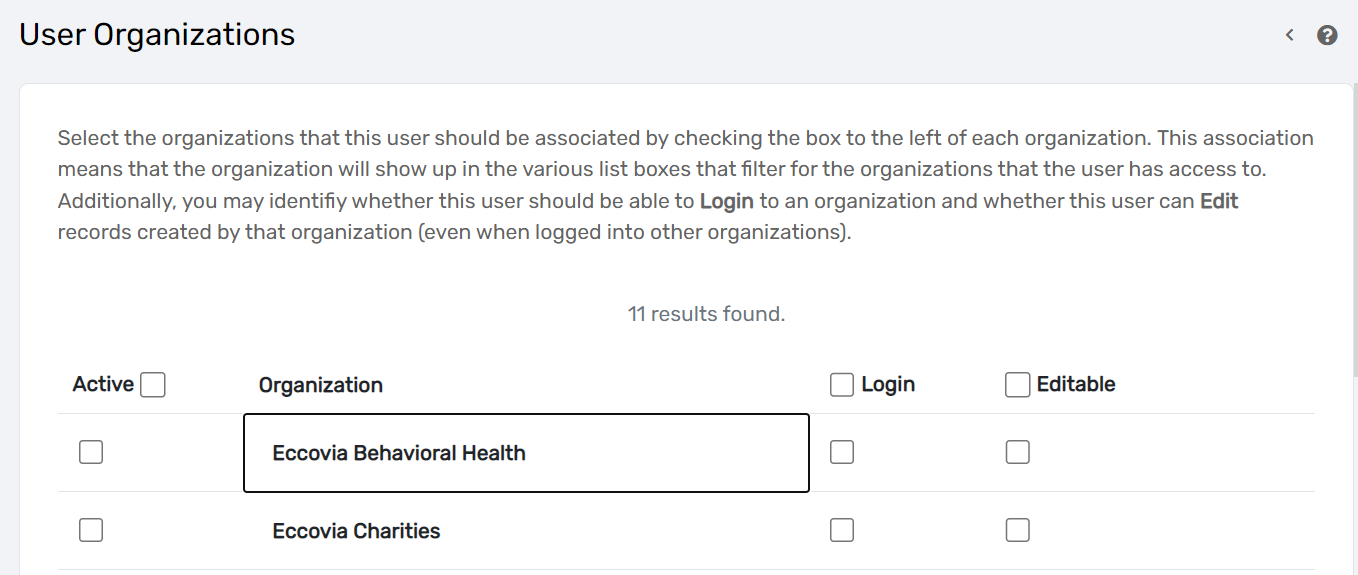
In addition to being the way ClientTrack labels different data collection entities, Organizations determine which sets of data a user can view in ClientTrack. A ClientTrack instance can contain one or hundreds of various Organizations. In short, Organizations are a fundamental security design component affecting multiple areas of a ClientTrack implementation.
Choose Organizations Functionality
The below actions are available on the Choose Organizations entry form.
- Use the Delete icon to remove a user’s access to an organization.
- Select the Active checkbox to gran access to that organization. A user that has Active access is able to view the specified organization in drop-down lists throughout ClientTrack, most notably when specifying report parameters.
- Check the Login box for any user who should be able to log in and create new records as a member of this organization.
- Check the Editable box if this user should also be able to edit records created by other users in this organization.
Managing a User’s Workgroup Access
Managing a User’s Workgroup Access
In addition to being ClientTrack’s way of organizing groups of users who perform similar roles, Workgroups determine which functionalities a user can view/use in ClientTrack. A ClientTrack instance can contain one or hundreds of various Workgroups. Depending on a user’s Workgroup setup, the user will be allowed to create, update, and/or delete data.
Choose Workgroups Functionality
Select the Active checkbox to gran access to that Workgroup. A user with Active access can
access that Workgroup while logged into that specific ClientTrack instance.
SECURITY ORGANIZATIONS
Security Organizations

Security Organizations control which Clients, Transactions, and Setup Data each User logged into an Organization has access to. When a User logs into an Organization, that Organization’s settings determine the visibility of Client Demographic/Transactional Data and Setup Data.
| Please Note: An Organization does not affect a User’s Interface other than changing the Setup Data seen by a User. Workgroups determine the Dashboards, Forms, Menu Groups, and Menu Options a User sees. |
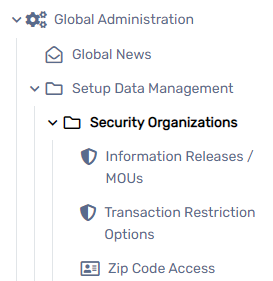
Security Organizations are managed by going to the Home Workspace, Global Administration Menu Group, then Setup Data Management, and selecting Security Organizations.
Adding a New Security Organization
Adding a New Security Organization
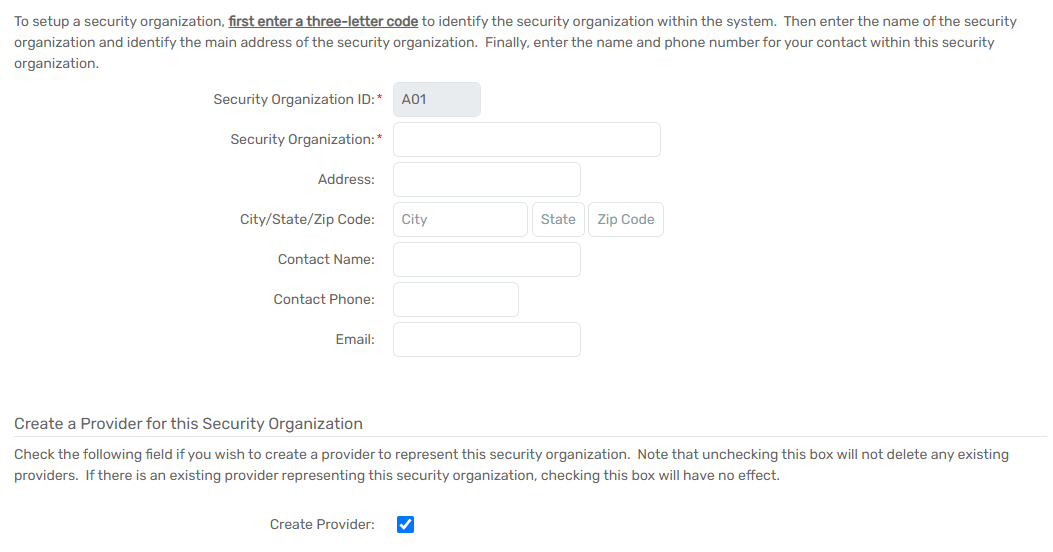
- On the Security Organizations search form, select the Add New Security Organization button.
- Enter a unique, three-character code to represent this organization in the Security Organization ID field. Most instances have this field auto-generate to prevent errors.
- Enter a name in the Security Organization text box; this will serve as the Security Organization’s name in ClientTrack. Complete the Address, City/State/Zip Code, Contact Name, Contact Phone, and Email fields if necessary.
- If the Security Organization also needs a corresponding Provider created, select the checkbox next to Create Provider.
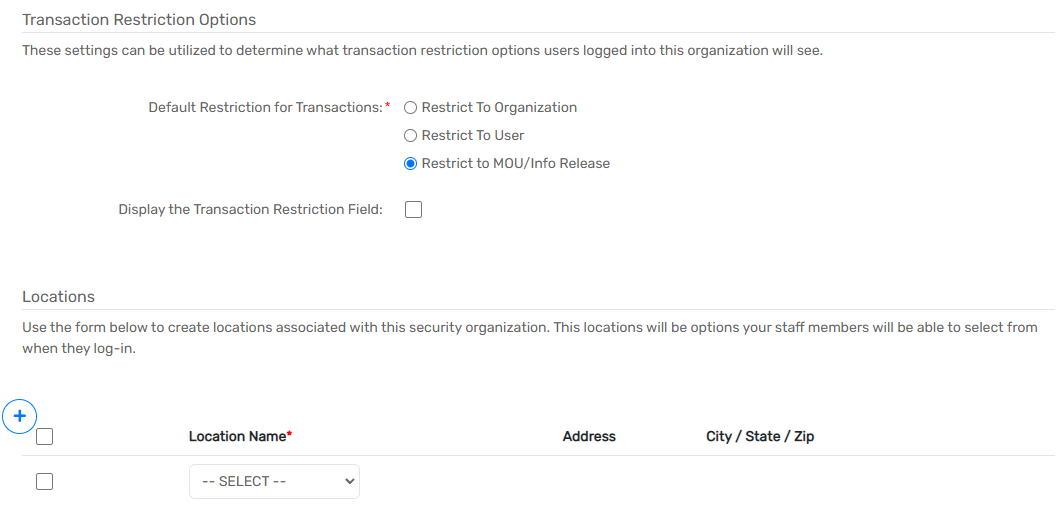
- Select the Default Restriction for Transactions and select or unselect the checkbox for the Display the Transaction Restriction Field.
| Please Note: These restriction settings can be utilized to determine what Transaction Restriction Options Users logged into this Organization will see. |
- If applicable, select Location Name(s) for the Security Organization. Locations indicate where the Security Organization is located and could also be utilized in certain forms.
- Select the Save button to save the form’s data.
Managing an Organization’s Assigned Users
Managing an Organization’s Assigned Users
Security Organization access can be controlled on a User-by-User basis using the User Management Menu Option; however, mass changes to a Security Organization’s User access are better managed through the User Access Option.
Navigation
Security Organizations are managed by going to the Home Workspace, Global Administration Menu Group, then Setup Data Management, followed by Security Organizations and selecting the Action Button next to the necessary Security Organization.
Giving a Security Organization User Access
Giving a Security Organization User Access
- Select the Action Button next to the necessary Security Organization to manage User access, followed by Assigned Users.
- Select or unselect the Login checkbox for any User who should log in and add new records as a member of this Security Organization. Select or unselect the Editable checkbox if this User should be able to edit records owned by this Security Organization. Please note these settings are independent of one another.
- Select the Save & Close button to save the form.

Information Releases/MOUs
Information Releases/MOUs
What is an Information Release/MOU in ClientTrack?
In ClientTrack, the Security Organization level sharing of data is defined by an MOU (Memorandum Of Understanding). An MOU indicates the information-sharing relationship between Security Organizations, and the sharing relationship can be one-way or bi-directional. After MOUs have been defined and set up, they can be referenced in the form for adding or editing client information. The MOU also controls information sharing for specific transactions when Unrestricted is selected as the Restriction Option.
Navigation
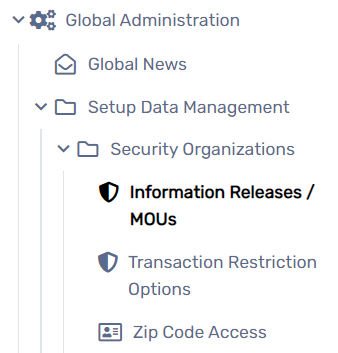
Information Releases/MOUs are managed by going to the Home Workspace, Global Administration Menu Group, then Setup Data Management, and selecting the Information Releases / MOUs Menu Option under Security Organizations.
Adding a New Information Release/MOU
- On the Information Releases / MOUs search Form, select the Add New button.
- Enter a unique number to represent this MOU in the Information Release No. field.
- Enter a name in the Information Release Name text box; this will serve as the MOU title in ClientTrack.

- If necessary, enter Comments.
- Select the Save button to save the Form’s data.
Transaction Restriction Options
What are Transaction Restriction Options in ClientTrack?
A Security Organization’s default security settings are determined by a User through the Transaction Restriction Options page. These settings determine which Transaction Restriction Options are visible/editable by particular Users. Utilizing these settings allows the system to handle the finer aspects of the Security Model without input from the Users.
| Please Note: If the default Transaction Restriction Options settings are not set to hide the options on transactional forms, Users will have the ability to change the sharing setting on the transaction form. |
Navigation
Transaction Restriction Options are managed by going to the Home Workspace, Global Administration Menu Group, then Setup Data Management, and selecting the Transaction Restriction Options Menu Option under Security Organizations.
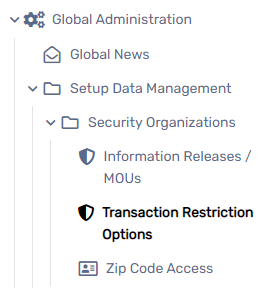
Managing Transaction Restriction Options
- Navigate to the Transaction Restriction Options Form.
- Check or uncheck the checkboxes as necessary.

-
Select the Save & Close button to save the changes to the Form.
CLIENT ADMINISTRATION
Client Administration

System Administrators have access to certain features that will allow them to manage client records. These features are detailed in the following walk-throughs.
Client Security Model Basics
Client Security Model Basics
Two Record Types in ClientTrack
- Entity Record Data: Most commonly associated with Client Records in ClientTrack, Entity Record Data for Clients can include name, birthdate, address, SSN, and other demographic fields.
- Transactional Record Data: These include all interactions or data collection associated with the Entity. For Clients, that means assessments, case notes, services, enrollments, etc.
| Please Note: Ownership of Record Data in ClientTrack is determined by the Organization that created the Entity or the Transaction. Every Entity and Transaction in ClientTrack is automatically stamped with the Organization’s ID that created it. |
Client Record Security
Client Record Security
Below are the three functionalities that determine how Client Record Data is shared between Organizations.
| MOU | Organization-level sharing where agencies can define sharing relationships between each other defined in formal Memorandums of Understanding (MOUs). The sharing relationship can include one-way or bi-directional sharing for a specific range of dates. |
| Release Exceptions | Allows the release of Client Record Data to be specified on a Client-by-Client basis, regardless of the Organization sharing rules. For example, two Organizations may not share data, but the Client-specific release will override this initial setting. The Release Exception is valid through a specific date. This option is more restrictive and requires a User to add Release Exceptions manually on a Client-by-Client basis. |
| Restrict Intake | Allows the restriction of the Client Record Data solely to the Organization that created the Client, regardless of any MOUs in place. |
Navigation
Clients are managed by going to the Home Workspace, Global Administration Menu Group, and expanding the Client Administration Menu Group.
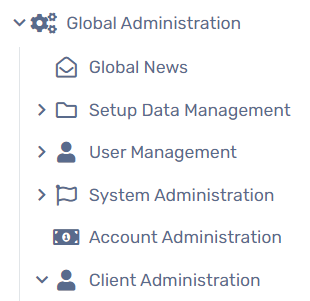
| Please Note: Adding Clients and Transactional Data (i.e., Assessments, Services, Goals, Barriers, etc.) associated with a client are managed through the Client Workspace and covered in the ClientTrack User Guide. |
Deleting a Client
Deleting a Client
Overview
The Delete Client process allows ClientTrack Administrators to delete a client record and their related transactional records throughout the ClientTrack implementation. The Delete Client process works by updating the active status' for the client record and their related transactional records from A/Active to D/Deleted. After the Delete Client process is complete, the Client Record will no longer be accessible in ClientTrack except on the Soft Delete Process Queue.
| Please Note: ClientTrack’s Delete Clients functionality uses the soft delete method, meaning that Clients can be restored if deleted by mistake. Any Transactional Data associated with the Client will also be deleted and can be found in the functionality’s Recycle Bin if the Client is restored. |
Navigation
The functionality to delete a Client can be found by going to the Home Workspace, Global Administration Menu Group, expanding the Client Administration Menu Group, and selecting the Clients Menu Option.
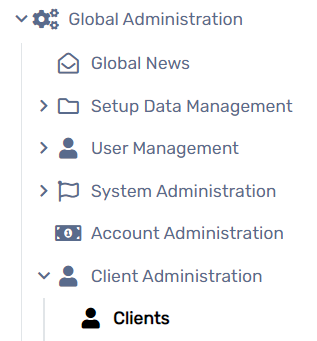
Deleting a Client
- Use the filters to locate the necessary Client on the Client Administration search form.
- Select the Action button to the left of the Client name, followed by the Delete option to soft delete the Client.

- Select the Yes button to confirm your decision.
- The client selected for deletion will now appear in the Soft Delete Process Queue.
Soft Delete Process Queue
The Soft Delete Process Queue will display the history of Soft Deleted Client requests. The client in this queue may have been restored and therefore no longer deleted. The Soft Delete process works by updating the Active Status of the selected Client Record and all records related to the Client from ‘A’/Active to ‘D’/Deleted. Users can navigate through the various status' as a filter on the form. Depending on the status of the deletion, users may be able to re-add to the Delete Queue, remove from the Delete Queue, and select the client to review their information in the Client Workspace.
Navigation
The Soft Delete Process Queue can be found by going to the Home Workspace, Global Administration Menu Group, expanding the Client Administration Menu Group, and selecting the Soft Delete Process Queue Menu Option.

Soft Delete Process Queue Status'
- Added to Queue - The client record has been queued up for deletion, but the process has not yet begun. This status will allow users to remove the client record from the Queue if added incorrectly.
- In Process - The client record has been picked up by the Delete process procedure and is processing through all the transactional records to update the active status to ‘D’/Deleted.
- Complete - The Delete process completed and the client record is now set as ‘D’/Deleted.
- Error - The client record has been pulled into the Delete process procedure but encountered an error. The client record is not yet deleted.
System Properties
Two new system properties have been added to accompany the Soft Delete Client functionality. These system properties aim at providing end users better control over the total clients able to be deleted at one time, and how long the system should wait between a record being created and beginning the deletion process. System properties can be found within Global Administration > System Administration > System Properties
- ClientSoftDelete-BatchSize - Sets the value for the number of ClientID's to be included in each batch for soft delete.
- ClientSoftDelete-GracePeriodInMins - Sets the value for the Grace Period before the client soft deletion begins. This grace period is defined by the user and will allow the user to make any necessary changes before the deletion starts within the grace period. This grace period defaults to 120 minutes but may be updated by an administrator at any time.
User Permissions
User permissions for Delete Client can be found within User Management > Edit/Add New User > Tool Access Permissions > Feature Access
- Soft Delete Clients - Allows the user to delete any clients in the system. This permission should only be given to individuals with the highest level permissions, as a delete cannot be reversed if done incorrectly.
Note: Because this is a new user permission, users will not be granted this permission automatically. After deployment, administrators should review which users need this permission, and add it via User Management. |
Validations
There are several validations that the Delete Client process will review before completing the deletion process.
- Client cannot have an open enrollment
- Client cannot have an open housing facility check-in
- The client record cannot be part of a potential or processing merge
- The client cannot already be scheduled to be deleted
Hourly Delete Settings
The hourly Delete task can be found within Global Administration > Batch Processes > Scheduled Tasks > Hourly Soft Delete Client Processing > Edit
- By default, the soft delete process will run on an hourly basis from the hours of 6pm CT to 6am CT. These hours have been selected to avoid performance impacts during peak business hours.
- Users may update the hourly delete settings by modifying the Excluded Hours on the edit task form. Users may add additional excluded hours, or modify the existing hours selected. Any rows with a checkmark are hours that are excluding the Hourly Soft Delete task from running. To allow the Hourly delete task to run, remove the exclusion from the applicable rows.
- In order for users to edit the hourly task, users will need Data Export, Data Import, and Elevated API user permissions.
Note: Modifying the hourly delete settings is possible, but may negatively impact the async worker and performance when run during peak business hours as the task will be sequenced amongst reports, exports, and other items that are dependent on the async worker. |
Frequently Asked Questions
F.A.Q.
Q: What did the previous soft delete functionality do?
A: The soft delete functionality previously would process the real time deletion of a client record and it's related transactional data. This process had a 30 second timeout, and depending on the environment and data needing to be updated, could have performance impacts like timeouts and/or table locking.
Q: What's changed with the updated soft delete functionality?
A: The process now runs asynchronously with specific exclusionary hours (the process will run 6am - 6pm CT), similar to the Merge Client process. Updating the process to an asynchronous process mitigates the performance impacts felt in larger databases and allows the task to run continually for a given client record until all transactional records and the client record have been completely deleted. This previously wasn't possible since the process was completed on-demand, there was only a 30 second timeout.
Q: Can I restore a client record that has been deleted?
A: Yes, you can locate all (soft) deleted client records by navigating to the recycle bin on the Client Administration form. Please note, restoring the client record WILL NOT restore the transactional records that were also deleted during this process. Those records can be individually restored by navigating to the recycle bins of each item that needs to be restored.
Q: Why does restoring the client record from the recycling bin not restore the transactional records?
A: The system does not keep a log of all of the transactional records included in the delete process, only the client record and date of the deletion. If ClientTrack were to restore all records in the recycle bin for that specific client record, it may restore deleted records completed before the client record was deleted. For this reason, transactional records are not restored when a client record is restored.
Q: What will cause a record to not be deleted?
A: The client cannot have an open enrollment or be currently checked into a housing facility. If the client has either of these, the process will not be able to delete the client.
Q: Why are there exclusionary hours for when the soft delete functionality can run?
A: The goal with the exclusionary hours is to ensure optimal performance during peak business hours, 6am CT - 6pm CT. Users may update the exclusionary hours by navigating to the Home Workspace > Global Administration > Batch Processes > Scheduled Tasks. Note, users must have the correct user permissions to access the tasks form.
Q: A client record was added to the Soft Delete Process Queue but should not be deleted, what do I do?
A: Users can navigate to the Soft Delete Process Queue and remove the record from the Queue if the delete process has not begun. This situation is precisely what the system property, ClientSoftDelete-GracePeriodInMins, aims to assist with. The system property is used as a time delay from the time the Delete Client record is created to when it may be picked up with the Delete process. As an example, if the grace period is set to 60 minutes, the client record will be not be pulled into the Delete process for at least 60 minutes. This grace period allows users to review the Soft Delete Queue to remove any erroneous client records from the queue.
Merging Duplicate Clients
Merging Duplicate Clients
Overview
The Merge Client process allows ClientTrack Administrators to perform duplication and data quality clean-up throughout their environment. The Merge Client process works by merging two duplicate client records into one. This is accomplished by first updating all transactional records associated with the Source Client ID to the Target Client ID. The Merge Client process will then set the active status of the Source Client to ‘D’ or Deleted. After the Merge Client process is complete, the Source Client record should no longer have information associated to it. All transactional records can now be found under the Target Client record. To find more information about how Merge Client works and find answers to frequently asked questions, visit the Merge Client article.
| Please Note: If any transactional records are created or edited on the Source Client record during the Merge Process, the merge will loop back through to merge the still active records with the Target Client ID. |
Navigation
The functionality to merge a Client is found by going to the Home Workspace, Global Administration Menu Group, expanding the Client Administration Menu Group, and selecting the Merge Clients or Merge Multiple Duplicate Clients Menu Option.

Merge Clients
- Select the Add New button at the top of the form.
- Search for and select a Source Client and a Target Client.
| Please Note: The Source Clients transaction records will be transferred and re-associated with the Client selected in the Target Client field. The Client in the Source Client field will be soft deleted from the system once the merge is finalized. |


- Select Save.
- Once saved, the newly created merge record will appear on the Merge Clients search form.
- Select the Action button, followed by the Add to Merge Queue option to finalize the merge.

Please Note: The Add to Merge Queue button will only be visible to the user who created the merge record. |
Merging Multiple Duplicate Clients
- Select at least two of the filters and select Search.
-
Make a selection between each client result by choosing: Client 1, Client 2, No Action, or Ignore.
- When Ignore is selected for a possible duplicate, the paring will not be visible in future searches. Users can review all Ignored duplicate pairs in the Ignored Duplicates form nested under the Merge Multiple Duplicate Clients menu option.
| Clients with a red “X” will be the Source Client and merged into the Client in green, or the Target Client |
- Repeat for each row of results.
-
Select the Accept button to perform the action selected for each row.
- Selecting Accept will add the clients to the Merge Queue to be merged when the asynchronous process begins again.
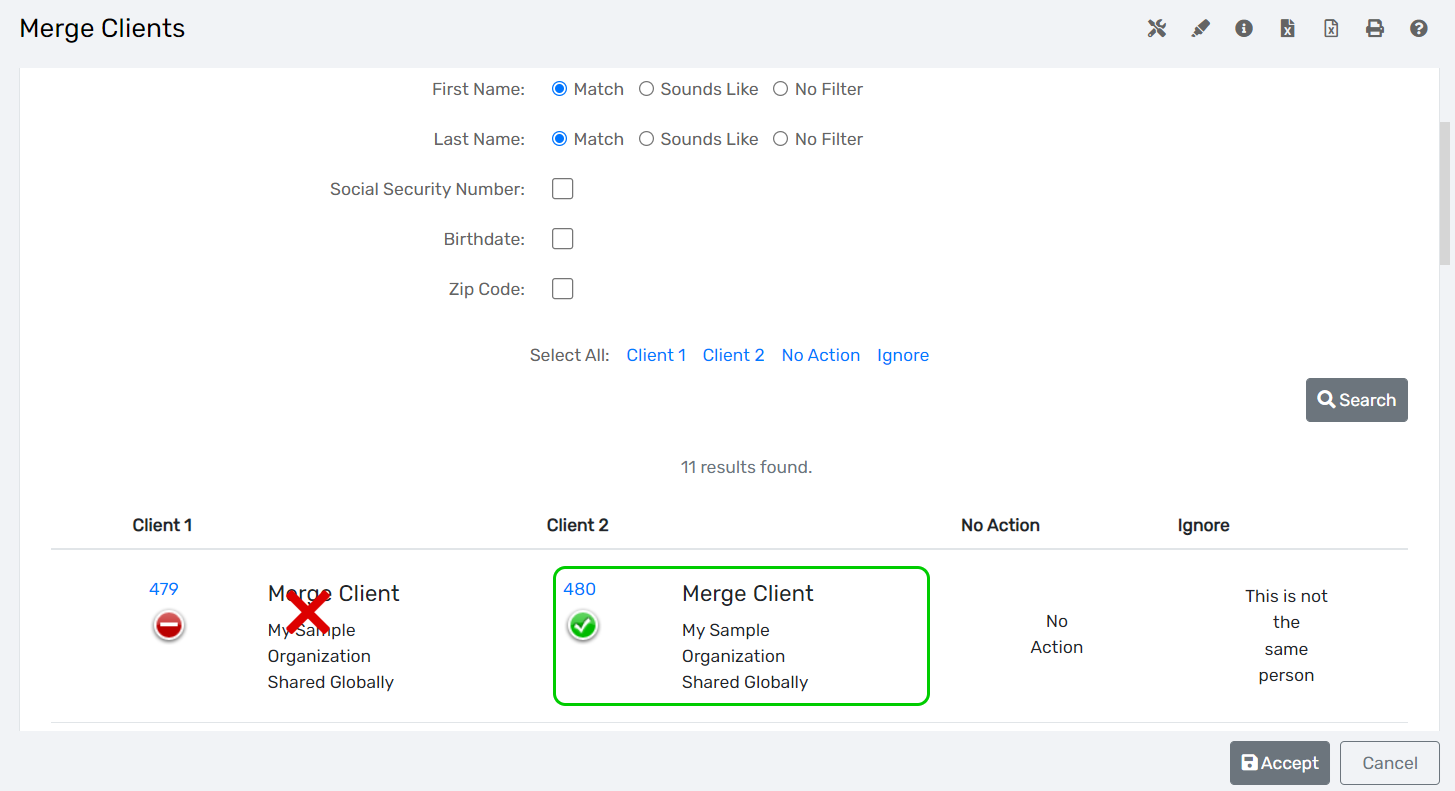
| Please Note: Selecting the Cancel button removes all of the choices on the search form. |
GRANT MANAGEMENT
Grant Management

Grants in ClientTrack refer to various sources of funding received by a Client. This system allows for the recording of grants and the tracking of multiple records (Enrollments, Service Codes) which the Grant funds. Grants are one of the primary filters found on ClientTrack push-button reports.
Navigation
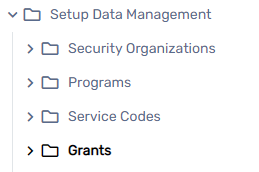
Grants are managed by going to the Home workspace, Setup Data Management menu group, expanding the Setup Data Management option, and selecting Grants. This screen will display the grants available in the system. Existing grants can be modified by selected the Action button next to the grant and selecting Edit Grant.
Adding a New Grant
Adding a New Grant
New grants can be set up by using the Add New or Quick Add New buttons at the top of the form. The Quick Add New form is a modified version of the in-depth grant setup form outlined below.
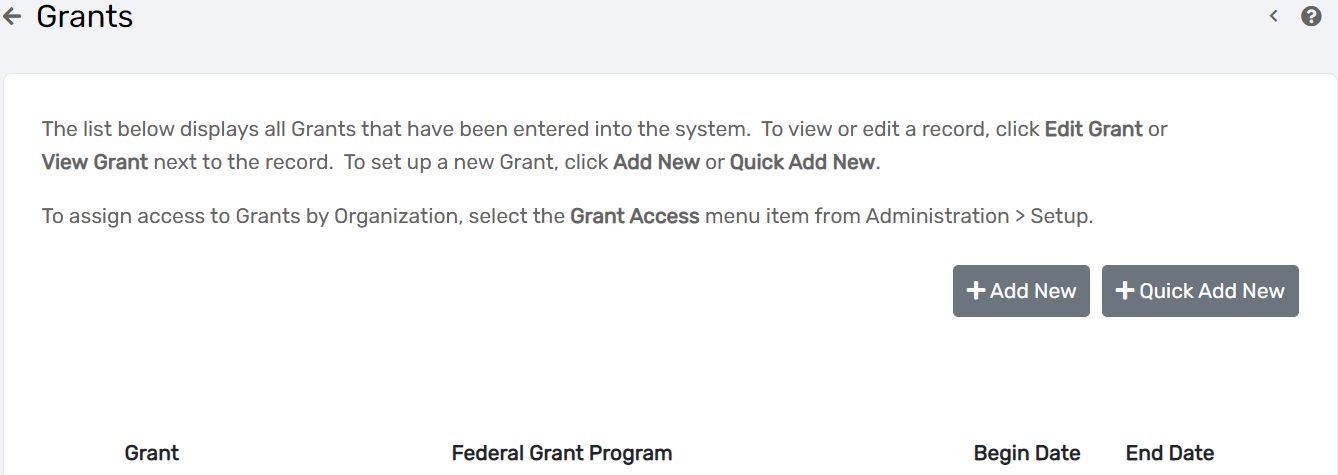
- On the Grant Management search form, select Add New.
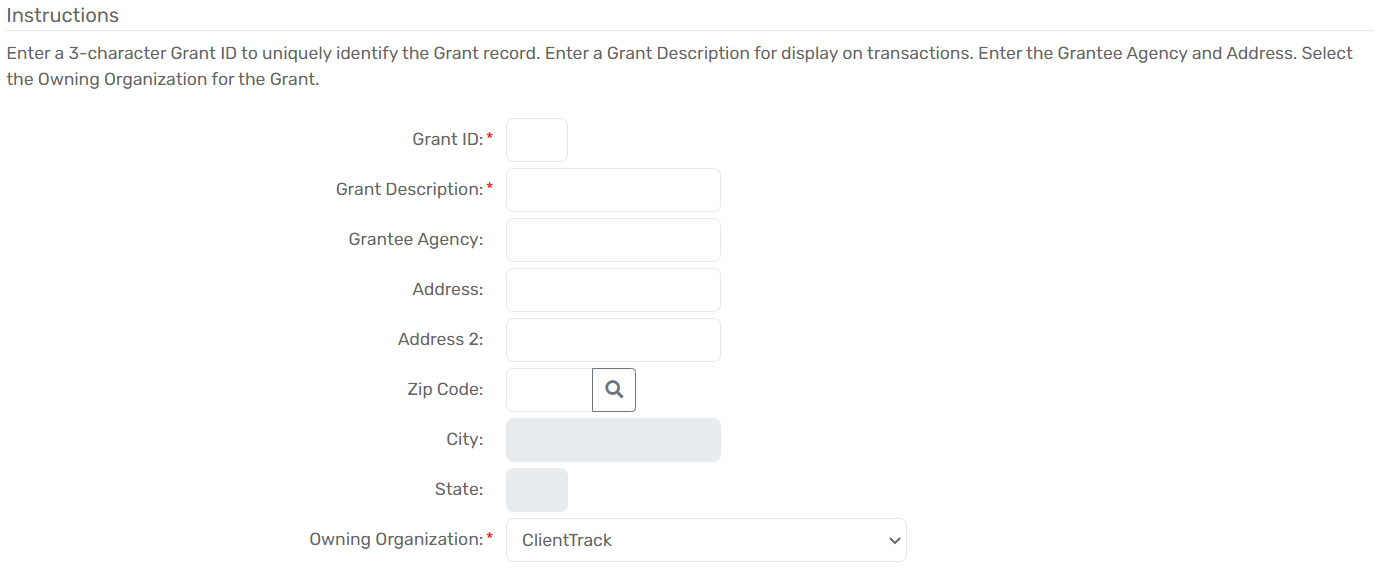
- If not automatically generated, enter a Grant ID, which, as specified in the form instructions, must be a unique three-character ID.
| Please Note: One- and two-character Grand IDs will cause duplication errors if they match any part of another Grant ID. |
- Enter a Grant Description. This determines how the grant will be identified in search forms and drop-down lists.
- If applicable, add a Grantee Agency and accompanying Address Information. These are used for reference and populating some reports.
- Select the Owning Organization. This identifies which organization has rights to edit the grant. The Owning Organization will default to the Organization the user is currently logged into.
- If necessary, check the Enrollment Required checkbox. This will not allow a client to receive services from that grant unless they are enrolled in a program tied to that grant.
- If applicable, use the Define Eligibility button to associate this grant with a pre-defined set of eligibility criteria.
- Select Next to continue on to the next form.
Additional Details Form

- Set the Begin Date and End Date. This defines the date range the grant will be accessible to associate with program enrollments and services.
- If applicable, use the Account drop down list and select an account or add a new account that uses this grant as a Managed Fund.

- Use the Accessing Organization multi-select box to select which organization(s) will have access to this grant. This box manages the information specific to this grant.
| Please Note: To manage access to multiple grants for an organization, see Controlling Organization Access to Grants below. |

- Select Next to continue on to the next form.
Project Information Form
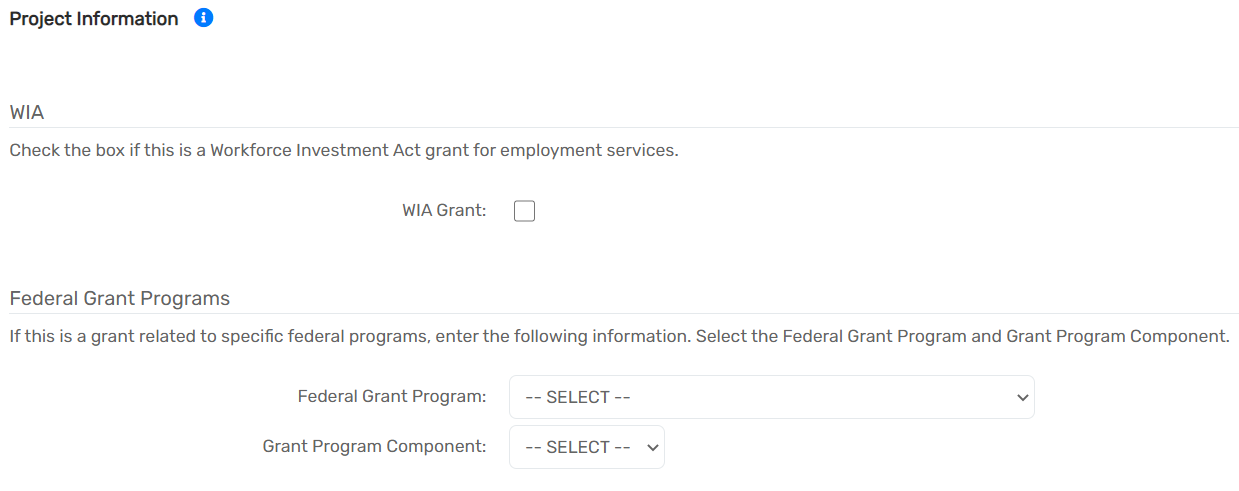
- Select WIA Grant if the grant is a Workforce Investment Act grant for employment services.
- For Federally funded grants, select the appropriate Federal Grant Program and the corresponding Grant Program Component.
- Select Finish and be returned to the Grants search form.
Organization Access to Grants
Organization Access to Grants
Grant access can be controlled on a grant-by-grant basis using the Accessing Organizations field as explained in the section above. Mass changes to grant access are better managed through the Grant Access form.
Navigation
The Grant Access screen can be found by going to the Home workspace, Setup Data Management menu group, expanding the Setup Data Management option and selecting Grant Access.
Giving an Organization Access to Existing Grants
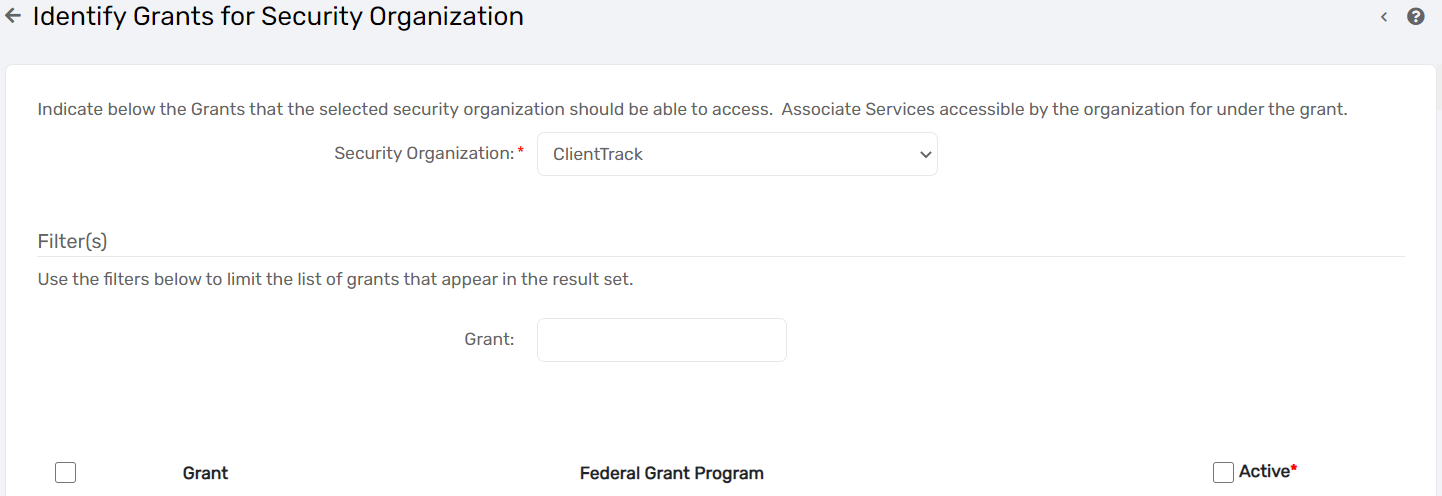
- Select the Security Organization the user wants to manage the access for. The form will default to the organization the user is currently logged into.
- If necessary, filter which grant records appear using the Grant open text field.
- Check or uncheck the Active box next to the grant to give or remove access for the selected Security Organization.
- Save your changes using the Save button at the bottom of the form.
Programs Funded by a Grant
Programs Funded by a Grant
Before processing, verify that your programs are set up in the system, using the Programs Management document. ClientTrack offers the system administrator specific control over which programs can be funded by which grants.
Navigation
Managing this from the grant perspective is accomplished by going to the Home workspace, Setup Data Management menu group, expanding the Setup Data Management option and selecting Grant Access.
Associating Programs with a Grant
-
On the Grant Access form, select the second icon next to the grant of interest to view
Programs Funded by this Grant.

- Find the needed program in the list of all programs accessible to the Selected Organization.
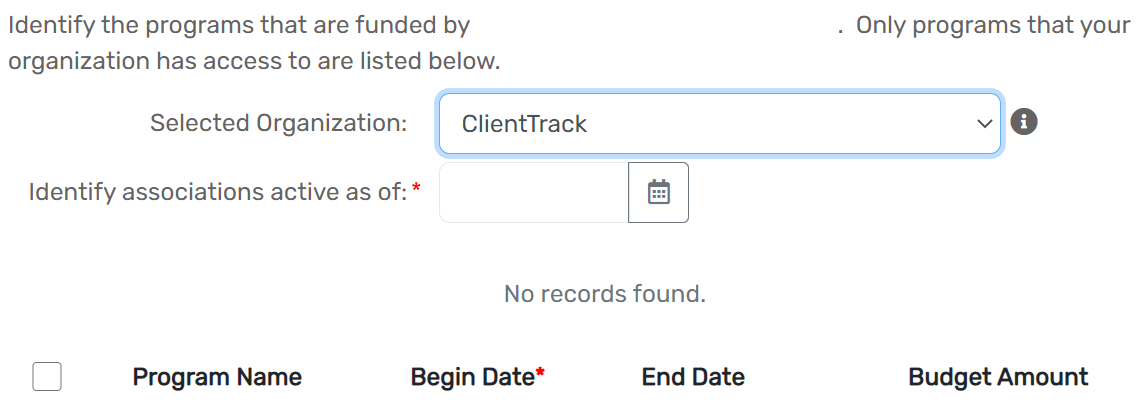
- Set the relationship between the program and grant by entering a Begin Date and End Date.
- Save your changes using the Save button at the bottom of the form.
- This relationship, once created, is enforced on the Enrollment form.
PROGRAM MANAGEMENT
Program Management
Programs are utilized in ClientTrack to indicate how a client participates with an organization. Programs can be differentiated one from another by the types of services the client might receive, the expected outcome for clients who participate, and the resources being used to provide services for the program. Clients are enrolled into programs upon entry, participate in a program for a length of time, and are exited from the program when their participation is complete.
Navigation
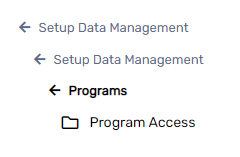
To access Programs, locate the Home space, then the Setup Data Management menu group. Click to expand the Setup Data Management option and click Programs.
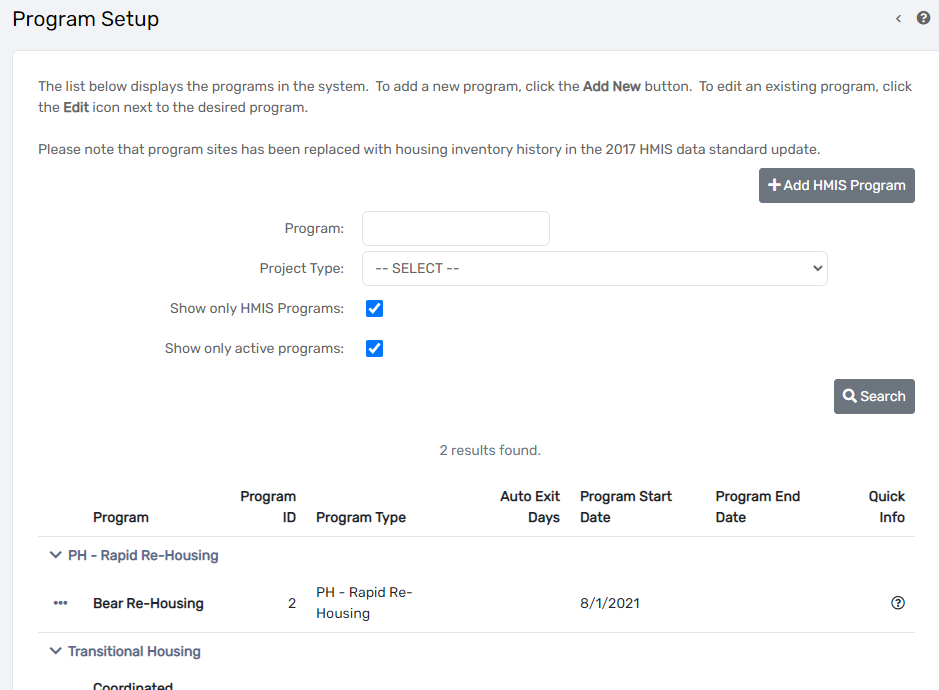
This screen displays the current programs available in the system. Existing programs can be modified by click on the Action Button next to the program and selecting Edit.
Adding a New Program
Adding a New Program
- Select the appropriate Add New button at the top of the form.
| Please Note: For HMIS and Head Start Programs, use the corresponding Add New button. |

- Enter the full name of the program in the Program Name field.
- If appropriate, select Clients Can Enroll. This indicates whether clients can directly enroll into this program via the Enrollment module.
- Enter a Program Start Date and a Program End Date, which defines the date range in which a client is able to enroll in the program.
- If applicable, use the Define Eligibility button to associate the program with a pre-defined set of eligibility criteria. If defined, use the text box for Eligibility Description to briefly describe the eligibility criteria for future reference.
- If necessary, enter the amount of Auto-Exit Days, which allows the system to take certain actions should a specific scenario be identified. To utilize these features, you need to define Participating Services associated with this program (see Managing Participating Services for a Program).
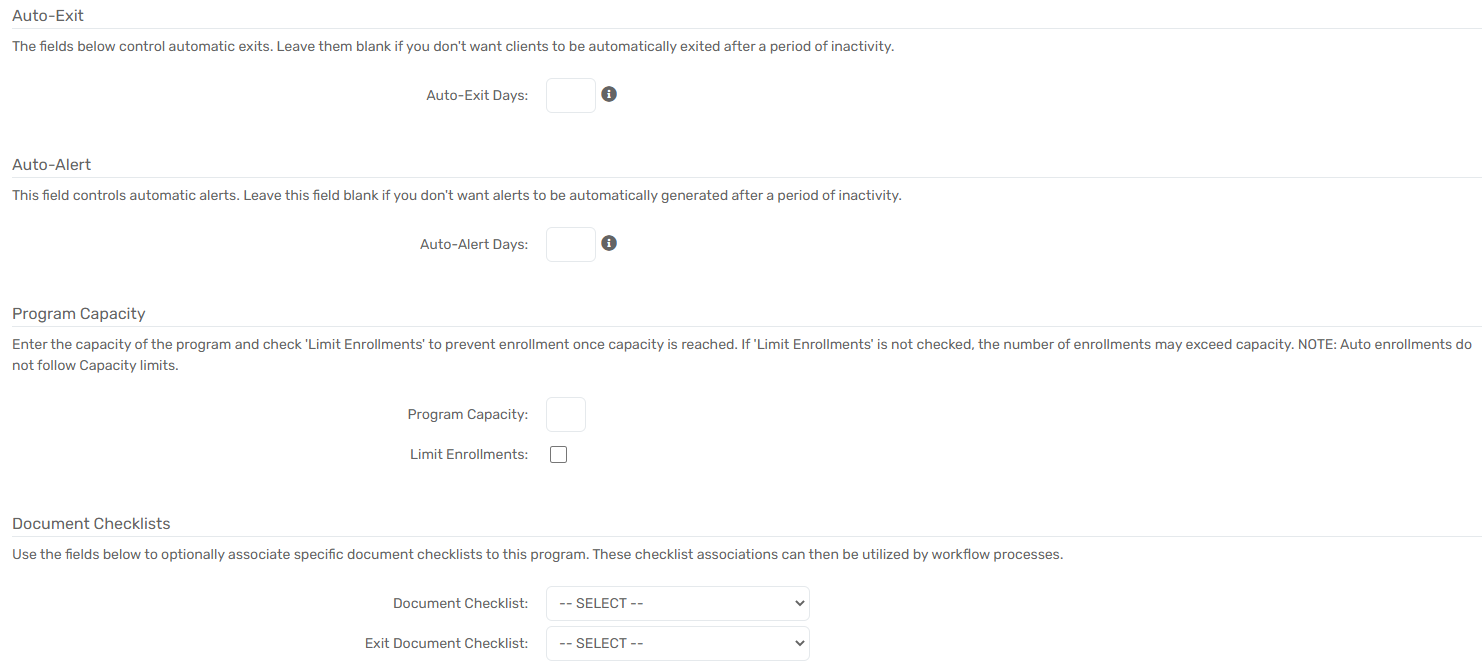
- If necessary, enter a Program Capacity. This sets the maximum number of enrollments allowed. If the Limit Enrollments box is also checked, this prevents enrollments once that number is reached.
| Please Note: Auto enrollments into a program do not adhere to program capacity settings. |
-
Use the Accessing Organization multi-select box to select which organization(s) have access
to this program. This multi-select box manages access for just this program. To manage access
to multiple programs, see Controlling Organization Access to Programs.
Report Mappings
Allows HUD reports to be run for Programs with the corresponding mappings selected.
-
If applicable, select the appropriate Program Type, HUD Program Descriptors, and Other
Reporting Compliance fields.
Organization Access to Programs
Organization Access to Programs
Program access can be controlled on a grant-by-grant basis using the Accessing Organizations field, as explained in the previous section. However, mass changes to program access are better managed through the Program Access screen.
Navigation
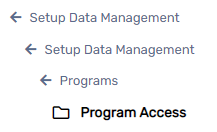
This screen can be found by going to the Home space, clicking on the Setup Data Management menu group, expanding the Setup Data Management option and selecting Program Access.
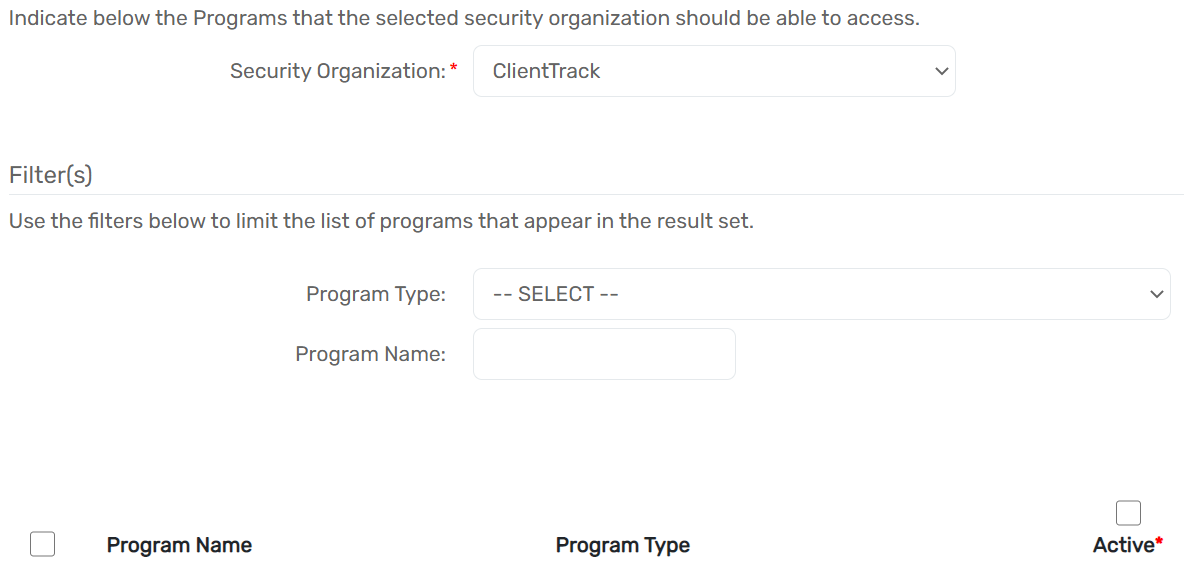
Managing Organization Access to Programs
- Select the Security Organization the user wants to manage the access for. The form will default to the organization the user is currently logged into.
- If necessary, filter the list of programs displayed using the Program Type drop-down list and/or the Program Name open text field.
- Check or uncheck the Active box next to the grant to give or remove access for the selected Security Organization.
- Save your changes using the Save button at the bottom of the form.
Participating Services for a Program
Participating Services for a Program
| Please Note: Set up Service Codes for participating services prior to associating them with the Program using the instructions below. |
Navigation
Participating Services for a program are managed by going to the Home space, clicking the Setup Data Management menu group, expanding the Setup Data Management option and clicking on Programs. Select the Action button next to a program name and select Participation Services.

- Select the Organization and Program for which you are identifying the Participation Services from the list.
- If necessary, filter the list of services displayed by selecting a Service Group.
- If applicable, select the Auto-Enroll checkbox. This causes the selected service to be automatically created for any client upon their enrollment into the program.
- Enter the Start Date. This defines the first date this service should be counted as a Participation Service.

Auto-Posting Services for a Program
Auto-Posting Services for a Program
This functionality allows for Direct Services to be entered for every client in a program at an assigned interval. Service Codes need to be created prior to associating them with the program using the instructions below.
Navigation
Auto-Posting Services for a program are managed by going to the Home space, clicking the Setup Data Management menu group, expanding the Setup Data Management option and clicking on Programs. Select the Action button next to a program name and select Auto-Posting Services.

Adding a New Auto-Posting Service for a Program
- Find the desired Program in the list and select the Action button to the left of the program name, followed by Auto-Posting Services.
- Select the Add New button in the top right-hand corner of the screen. The user will be redirected to a data entry form.
- Select the desired Service Code from the drop-down list and, if necessary, enter Units of Measure, Units, and Unit Value.
- Check the Auto-Post checkbox to bring up the Service Code’s posting interval options.
- Select the Frequency. This will set the number of services recorded per client, per interval. Select the Cycle. This will set the interval time. Choose from one of five options: Daily, Weekly, Monthly, Quarterly, and Yearly.
- If necessary, check the Prorate checkbox. Selecting the Prorate option will automatically change the units to correspond to the days enrolled depending on the interval selected. For example, if a service is setup to be auto-posted to enrolled clients at monthly, 30 Unit intervals, a client who was only enrolled in the program for 17 days in a month would receive a 17 Unit Prorated, Auto-Posted Service at the end of that month.
- Set the Date the User wants the service code to start Auto-Posting on. This is the date the auto-posting interval will begin.
- Select the Save button and the User will be redirected back to the list of all Auto-Posting Service Codes.
Managing Auto-Posting Services for a Program
Once Auto-Posting Services are on the list for a program, they can be edited or deleted.
-
Find the desired Program in the list and select the Action button to the left of the program name, followed by Auto-Posting Services.
- Select the Edit icon and the User will be redirected to the data entry form with the setup available for editing. Enter any necessary setup data and select the Save button. The User will be redirected back to the list of all Auto-Posting Service Codes.
- Select the Delete icon and the Auto-Posting Service Code will be removed from the list. Deleting an Auto-Posting Service Code is a “soft” delete and any User with Write Recycle Bin/Delete permissions can restore a deleted Auto-Posting Service Code’s association with a specific program.
- Select the Cancel button to return to the list of programs.
SERVICE CODE MANAGEMENT
Service Code Management
Service Codes (commonly referred to as just “Services”) are used throughout ClientTrack for a broad variety of purposes, including the tracking of Services provided directly to a specific client, Services provided to groups of individuals, and Services offered by partner programs and organizations.
Navigation
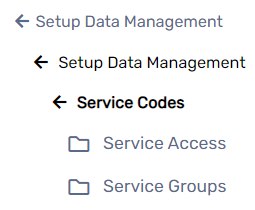
Service Codes are managed by going to the Home workspace, Setup Data Management menu group, expanding the Setup Data Management menu option, and selecting Service Codes.
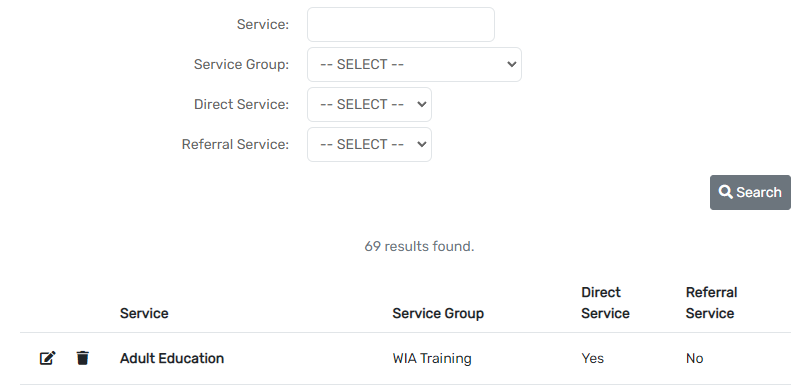
The screen below displays Service Codes available in the system. The list of Service Codes can be filtered by the name of the Service, the Service Group, and if the code is set up as a Direct Service, a Referral Service, or an Indirect Service. Existing codes can be modified by selecting the Edit icon to the left of the Service name.
Adding a New Service Code
Adding a New Service Code
- Select the Skippy icon at the top left, select Global Administration next, select Setup Data Management.
- Select the Service Codes folder then Add New Service Code button at the top of the form.

- If applicable select the Service Group. This dictates how the service will be categorized in ClientTrack for both lists and reports.
- Enter the unique title of the service in the Service open text box. Users may enter help text in the Long Description/Help Text box.
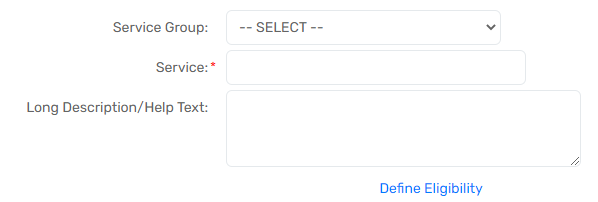
- If applicable, enter default values for the Service Code. These values may include the Unit of Measure, Unit Value, and Units. The default values are displayed on the Service form when the Service is being recorded. If necessary, the user has the ability to change the values for a specific instance.

- Select all appropriate Service Categories.
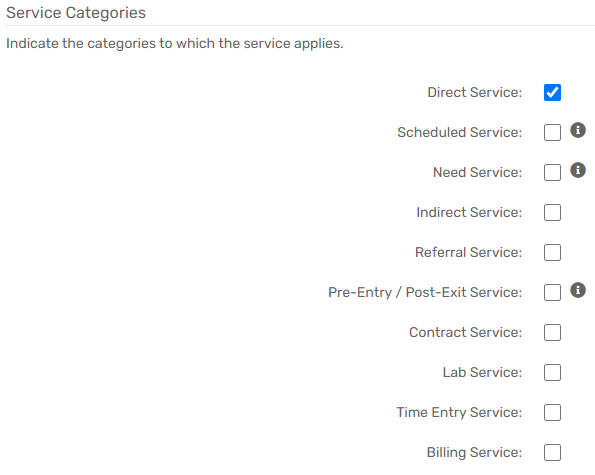
Service Categories
Service Categories determine which forms the service is displayed on. These attributes of a Service Code are used to filter them for specific purposes. For example, the Referral Service Code drop-down list on the Referral form only displays Services Codes marked as such. The Service Categories are as follows:
|
Direct Services |
Services that are provided directly to the Client by the Organization. Direct Services are always associated with specific Client records. |
| Scheduled Services | Services that occur on a specific schedule and can only be categorized as such if they are a Direct Service. |
| Indirect Services | Services provided where the receiving Client is not identified. Indirect Services are commonly used to track outreach efforts (number of brochures distributed) and community education events (number of people attending). |
| Referral Services | Services that may be provided by Organizations or Programs different from those the User is a part of. |
|
Pre-Entry/Post Exit Services |
Allows the Service Code to be selected for a Client even when the Client is not actively enrolled on the Service date. |
| Contract Services | Allows ClientTrack to track contracts with Providers for the provision of this Service. Only Service Codes with the contract property can be used for this purpose. |
| Lab Services | Services that appear in drop-down lists on lab orders and lab results forms. |
| Time-Entry Services | Allows for the Service Code to be selected on a time entry form. |
| Billing Services | Services that can be used for direct or third-party billing. Allows the Service Code to be used with the Billing functionality in ClientTrack. |
- Select Next in the bottom right-hand corner.
Additional Details Form
- If Billing Service is selected on the previous form, use the drop-down Bill As list to select the appropriate category this Service Code falls under.
- Use the Accessing Organization multi-select box to select which Organization(s) can access this Service Code. This multi-select box manages access to this specific Service Code.
| Please Note: To manage access to multiple Service Codes for an Organization, see the Controlling Organization Access to Service Codes section. |
Report Mappings
The Report Mappings section of the setup screen allows you to identify how this Service will be categorized in various standard reports.

- For CSBG, VOCA, ROMA, and Ryan White Service Codes, select the correct mappings.
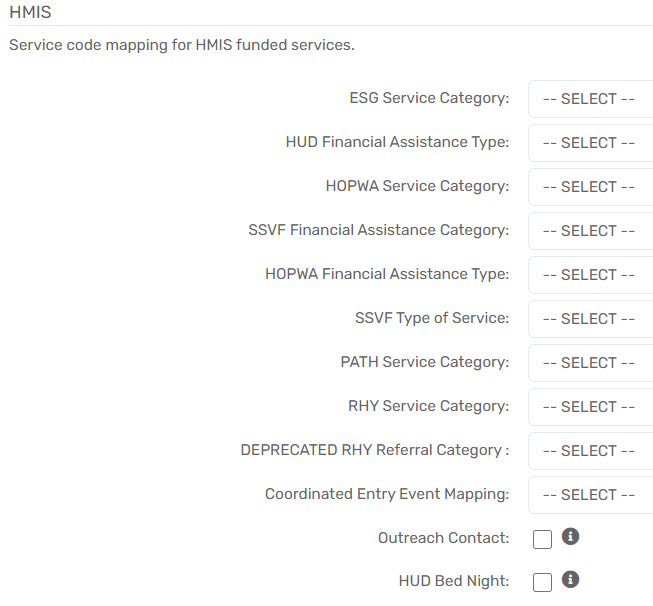
- For HMIS/HUD Service Codes, select the appropriate mappings.
Adding a New Service Group
Adding a New Service Group
- Select the Add New button at the top of the search form.

- Enter a description into the Service Group field to identify the Service Group.

- Select Save.
Managing Service Code Groups
Managing Service Code Groups
Service Groups divide Service Codes into categories to assist with sorting and reporting. ClientTrack often includes several Service Groups when implemented.
Navigation
Users can manage Service Groups by going to the Home space, Setup Data Management menu group, expanding the Setup Data Management option, and selecting Service Groups.
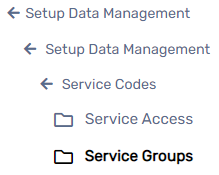
| Please Note: The Service Groups search form lists all current Services Groups recorded in the instance. Existing Service Groups can be modified by selecting the Action button next to the Service Group, followed by the View Related Service Codes button. |
Managing an Organization’s Access to Service Codes
Managing an Organization’s Access to Service Codes
Service Code access can be controlled on a code-by-code basis using the Accessing Organizations field as explained in the section previous; however, mass changes to an Organization’s Service Codes access are better managed through the Service Access screen.
Navigation
The Service Code access screen can be found by going to the Home space, Setup Data Management menu group, expanding the Setup Data Management option, and selecting Service Access.
Giving an Organization Access to Existing Service Codes
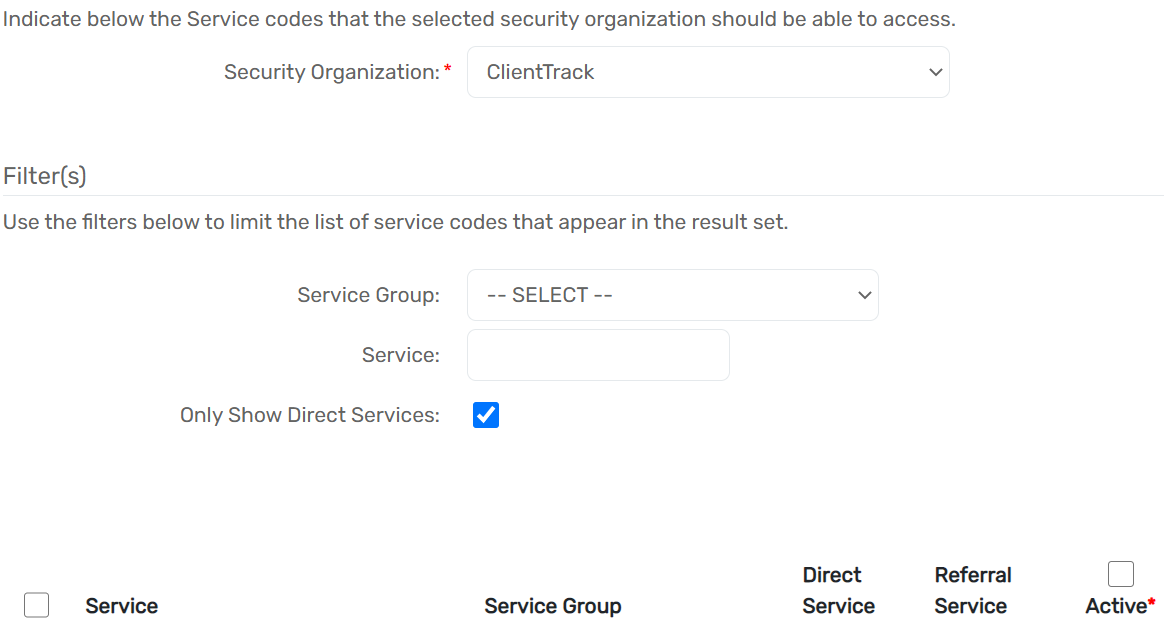
- Select the Security Organization the user wants to manage the access for. The form will default to the Organization the User is currently logged into.
- If necessary, filter the list of Programs displayed using the Service Group drop-down list and/or the Only Show Direct Services checkbox.
- Check or uncheck the Active box next to the Service to give or remove access for the selected Security Organization.
- Save your changes using the Save button at the bottom of the form.
EVALUATION FUNCTIONALITY
Evaluation Functionality

The Evaluation functionality is used in ClientTrack to determine options for lists seen in specific assessments. At the heart of the Evaluation functionality is the Evaluation Code — a seven-character ID that represents a particular assessment’s option on a list. It consists of a two-character Evaluation Type, a three-character Evaluation Group, and the two-character Evaluation Code. For example, the Evaluation functionality is utilized for the Goal Groups and Goal Codes in the standard Goal assessment and the Barrier Codes on the Barrier assessment.
Navigation
The Evaluation functionality is managed by going to the Home workspace, Setup Data Management Menu Group, expanding the Setup Data Management option, and selecting Evaluation.
Adding a New Evaluation Type
Adding a New Evaluation Type
Evaluation Types are the highest level of categorization in the Evaluation functionality. Evaluation Types are divided into Evaluation Groups, which are then divided into Evaluation Codes. Each Type indicates a significant difference in the category of data.
- On the Evaluation Management form, select the Add New button at the top of the form.
- Enter a unique, two-character ID to represent a new Evaluation Type ID, as well as a Description to act as the Evaluation Type title.

- Select the Accessing Organizations that will have access to this Evaluation Type. To manage access to Evaluation Types from an Organization’s perspective, please see Managing an Organization’s Access to the Evaluation Functionality section.

- Select Save.
| Please Note: Existing Evaluation Types can be modified by selecting the Action button next to the Type and selecting the Edit drop-down list option. |
Adding a New Evaluation Group
Adding a New Evaluation Group
Evaluation Groups allow you to create categories within an Evaluation Type. Each Group should indicate a significant difference between categories within an Evaluation Type.
Navigation
Evaluation Groups are managed by going to the Home workspace, Setup Data Management Menu Group, expanding the Setup Data Management Menu Option, and selecting Evaluation. Then, select the Action button next to the Evaluation Type you want to manage the Groups for and select the Groups drop-down list option.
Add a New Evaluation Group
- On the Evaluation Group Management form, select the Add New button at the top of the form.
- Enter a unique, three-character ID to represent a new Evaluation Group ID and a Description to act as the Evaluation Group title.
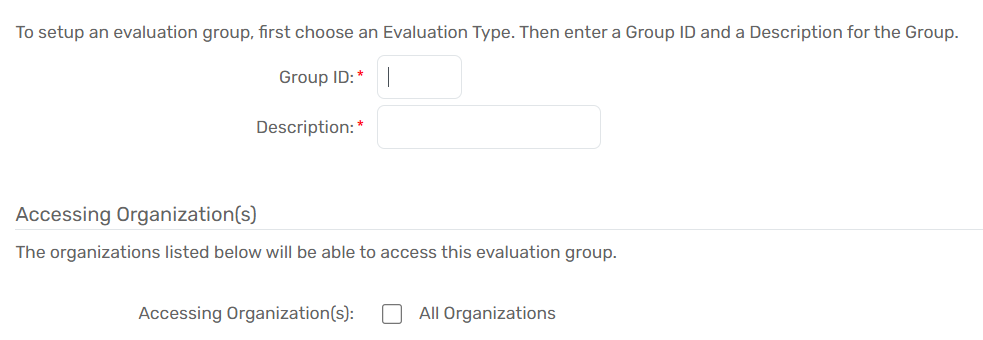
- Select the Accessing Organizations that will have access to this Evaluation Group. To manage access to Evaluation Groups from an Organization’s perspective, please see Managing an Organization’s Access to the Evaluation Functionality.
- Select Save.
| Please Note: Existing Evaluation Groups can be modified by selecting the Action button next to the Group and selecting the Edit drop-down list option. |
Adding a New Evaluation Code
Adding a New Evaluation Code
Evaluation Codes allow you to create categories within an Evaluation Group. Each Code should indicate a significant difference between categories within an Evaluation Group.
Navigation
Evaluation Codes are managed by going to the Home workspace, Setup Data Management Menu Group, expanding the Setup Data Management Menu Option, and selecting Evaluation. Then, select the Action button next to the Evaluation Type you want to manage the Code in. Select the Groups menu option, select the Action button next to the Evaluation Group you wish to manage the Code for, and select the Codes menu option.
Add a New Evaluation Code
- On the Evaluation Codes Management form, select the Add New button at the top of the form.
- Enter a unique, two-character ID to represent a new Evaluation Code ID and a Description to act as the Evaluation Code title.
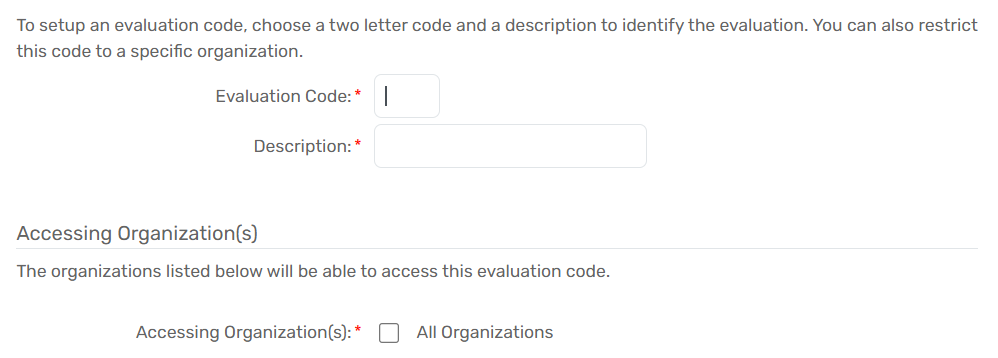
- Select the Accessing Organizations that will have access to this Evaluation Code. To manage access to Evaluation Codes from an Organization’s perspective, please see Managing an Organization’s Access to the Evaluation Functionality
- Select Save.
| Please Note: Additional fields may appear on this set-up screen depending upon which Evaluation Type the Evaluation Code relates to. For example, an Ask HMIS Indefinite Question (Chronic) Checkbox will be visible if the Evaluation Type is Barrier. |
Organization Access to Evaluation Functionality
Organization Access to Evaluation Functionality
Evaluation access can be controlled on a Type, Group, or Code basis using the Accessing Organizations field as explained in the sections above; however, mass changes to an Organization’s Evaluation access are better managed through the following processes.
Navigation
An Organization’s Evaluation functionality access is managed by going to the Home workspace, Setup Data Management Menu Group, expanding the Setup Data Management Menu Option, and selecting Evaluation Access.
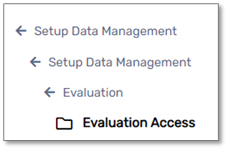
Giving an Organization Access to Existing Evaluation Codes
- After navigating to the Evaluation Access form, use the icon next to the Evaluation Type to access the Evaluation Group Access screen for that Evaluation Type’s Groups.

- Use the icon next to the Evaluation Group to access the Evaluation Codes Access screen for that Evaluation Group’s Codes.

- Check or uncheck the Active checkbox to allow or remove access, respectively.

- Save your changes using the Save button at the bottom of the form.
PROVIDER MANAGEMENT
Provider Management
As with client records, you have special access to manage the provider records in the database. You have access to delete erroneous provider records as well as merge duplicated provider records into a single record. Providers are used in ClientTrack as a part of the Referral functionality.
Navigation
Providers are managed by going to the Home Workspace, Global Administration Menu Group, and expanding the Provider Administration Menu Option.
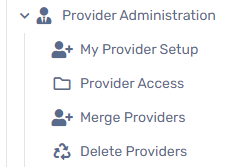
| Please Note: Adding Providers and Provider Services are done through the Providers Workspace and are covered in the ClientTrack User Guide. |
Deleting a Provider
Deleting a Provider
Navigation
The functionality to delete a Provider can be found by going to the Home Workspace, Global Administration Menu Group, expanding the Provider Administration Menu Option, and selecting Delete Providers.
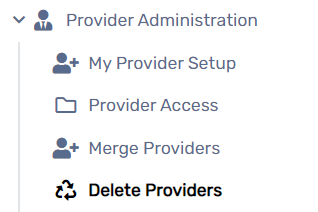
| Please Note: ClientTrack’s Delete Providers functionality uses the soft delete method, meaning that Providers can be restored if deleted by mistake. |
- Use the filters to locate the necessary Provider(s) on the Delete Providers search form.
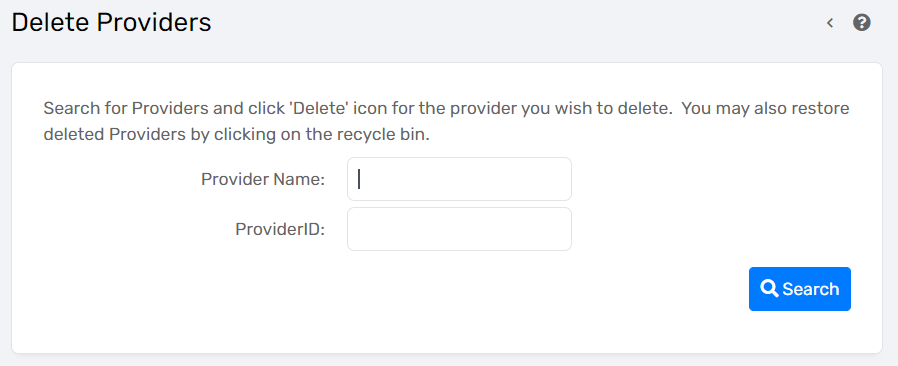
- Select the Delete icon on the left of the Provider name to soft delete the Provider.

- Delete any additional Providers and navigate away from the form.
Merging a Provider
Merging a Provider
Navigation
The functionality to merge Providers can be found by going to the Home Workspace, Global Administration Menu Group, expanding the Provider Administration Menu Option, and selecting Merge Providers.
| Please Note: The Merge From Provider’s transaction records will be transferred and re-associated with the Provider selected in the Merge Into Provider field. The Provider in the Merge From Provider field will be soft deleted from the system once the merge is finalized. |
- Select the Add New button at the top of the form.
- Select a Merge From Provider and a Merge Into Provider.


- Select Save.
- Once saved, the newly created record will appear on the Merge Providers search form with an Unmerged status.
- Select the Action button, followed by the Merge option to finalize the merge.
Managing an Organization’s Access to Providers
Managing an Organization’s Access to Providers
Provider access can be controlled on a Provider-by-Provider basis using the Accessing Organizations field as explained in the previous section. Mass changes to an Organization’s Provider access are better managed through the following process.
Navigation
An Organization’s access to a Provider can be found by going to the Home Workspace, Global Administration Menu Group, expanding the Provider Administration Menu Option, and selecting Provider Access.
- Select the Security Organization the user wants to manage the access for. This form defaults to the Organization the user is currently logged in to.
- If necessary, use the filters to locate the Provider(s).
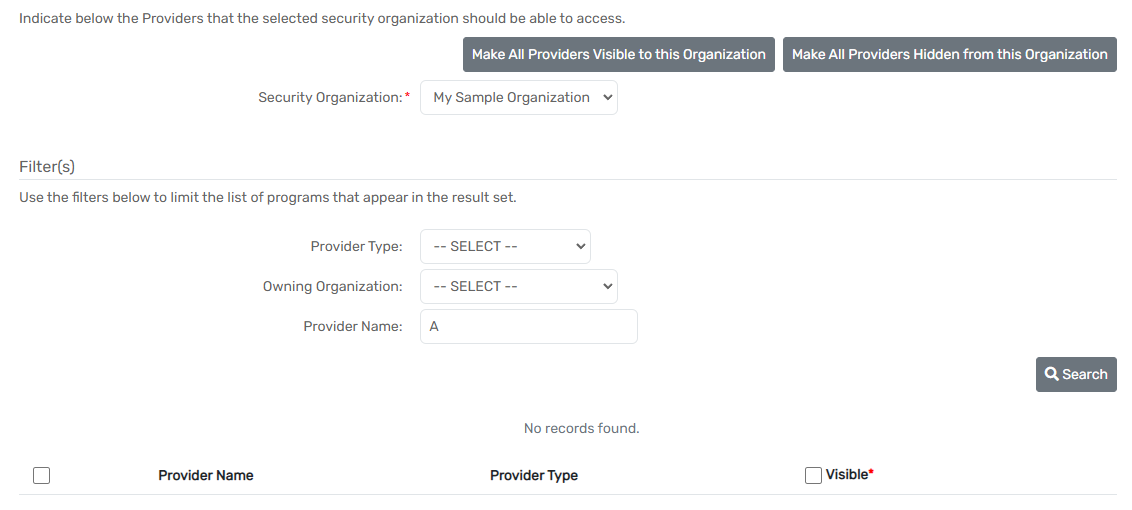
- Check or uncheck the Visible check-box next to the Provider to give or remove access for the selected Security Organization.
- Save your changes using the Save button at the bottom of the form.
DOCUMENT CHECK MANAGEMENT
Document Check Management
Document Checklists are utilized in ClientTrack to define a set of requirements. Document Checklists are commonly used to gauge eligibility for a Program or Service and verify that a client has agreed to or submitted certain signed forms.
Navigation
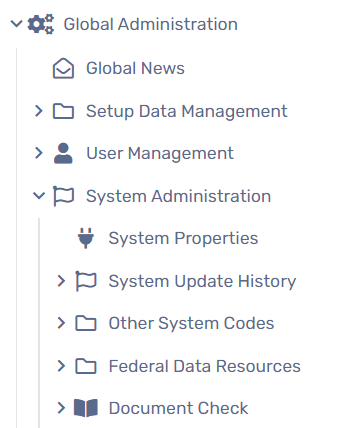
Document Checklists are managed through the Document Check functionality by going to the Home Workspace, Global Administration Menu Group, followed by the System Administration Menu Group, then expanding the Document Check Menu Option, and selecting the necessary Menu Option.
Introduction to Document Checklists
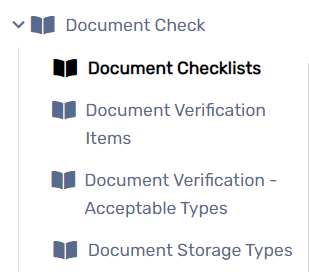
Document Checklists use Verification Items, Acceptable Types, and Storage Types to create a list of documents for front-end Users to record what a client has or does not have during an interaction.
Navigation
Document Checklists are managed by going to the Home Workspace, Global Administration Menu Group, then the System Administration Menu Group, and expanding the Document Check Menu Option and selecting Document Checklist.
Adding a Document Checklist
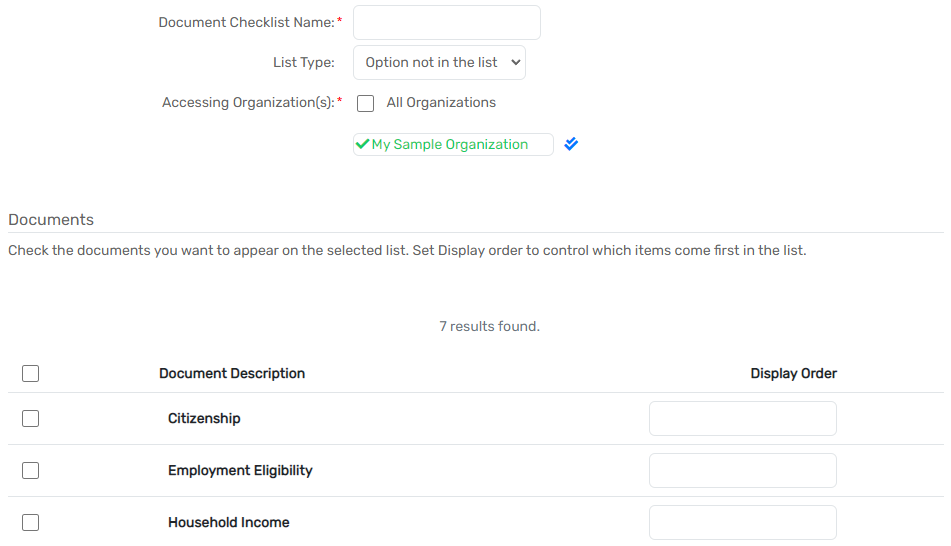
- On the Document Checklist form, select the Add New List button at the top of the screen.
- Enter the name of the checklist in the Document Checklist Name field and choose your Accessing Organizations for this new list.
- Check the checkbox next to the necessary documents needing to be included in this Document Checklist. The User can also set the order of appearance in the list by entering the appropriate order in the Display Order field.
- Select Save
Introduction to Verification Items
Verification Items are the requirements that can be included in various Document Checklists. It is ideal to set these up before setting up the Document Checklist so they are available when you set up the Checklist.
Navigation
Verification Items are managed by going to the Home Workspace, Global Administration Menu Group, then the System Administration Menu Group, expanding the Document Check Menu Option and selecting Document Verification Items.
Introduction to Acceptable Document Types
Acceptable Types define what ways a verification requirement can be fulfilled. It is ideal to set these up first to be available when you set up a Verification Item.
Navigation
Acceptable Types are managed by going to the Home Workspace, Global Administration Menu Group, then the System Administration Menu Group, expanding the Document Check Menu Option and selecting Document Verification - Acceptable Types.
Adding a New Acceptable Document Type
- On the Document Verification - Acceptable Types form, select the Add New Acceptable Document Type button at the top of the form.
-
Enter a Document Type that will serve as the Acceptable Document Type’s title.

-
Select Save.
CONFIGURATION SYNCS
Configuration Syncs
Configuration Syncs is a process that is initiated on demand. A Configuration Sync is the process of deleting all Forms, Workflows, Queries, etc., in the Destination environment and then copying those items to the Source environment.
Configuration Syncs Overview
Configuration Syncs Overview
There are two different types of data syncs associated with ClientTrack: Configuration Syncs and Replication Syncs1. This section will cover Configuration Syncs, a process that is initiated on demand.
Mechanically, a Configuration Sync (referred to as “Sync”) is the process of deleting all Forms, Workflows, Queries, etc., with an ID between 1000000000 and 1999999999 in the Destination environment and then copying any Forms, Workflows, Queries, etc., in that same ID range from the Source environment.
Not overwriting these items allows for a deleted element in the Source environment to be completely removed in the Destination environment after a Sync.
Most implementations will have two or three environments, but an implementation’s Production (PROD) environment will always play the role of the Destination environment when involved in a Sync. Syncs will normally take about thirty minutes but can take longer depending on an implementation’s database size.
The Destination database is backed up prior to the configuration changes being moved from the Source. The database backup remains in place for a period of 30 days to provide recoverability options to configuration changes for any unexpected behaviors encountered following the Sync process.
| 1 A Replication Sync is an automated process by which a production database is replicated to an Azure Advanced Analytics database, enabling analysis on production data by a client without interfering with production data or systems. While Replication Syncs are outside the scope of this document, they can be adversely affected by Configuration Syncs. |
Configurations Copied During a Sync
Configurations Copied During a Sync
For all of the following items, all configuration objects are removed from the Destination environment and replaced with the configurations that are maintained in the Source environment.
Forms including associated Data Elements, Buttons, Help Text, and Rules/Actions.
Workgroups (new and existing) updated in non-production environments will sync associated Workspaces, Menu Groups, Menu Options, Calendar options, Entity configurations, and Form/Workflow assignments. Workgroups are synced based on their name rather than the ID and must use the same name in non-production and production environments.
Dashboards. However, personalized User Dashboards (changes made by individual users) not Sync.
Drop Down Lists including Definitions, Baseline Lists, and List Items.
Workflows including associated Steps, Conditions, and Actions.
Case Note Templates. However, the assignment of a template to specific categories for a specific Organization do not Sync.
Data Explorer Domains including the setup of a Domain, its relationship with other Domains, and the assignment of that Domain to specific Workgroups.
Reports designed in ClientTrack Report Designer, and Report Files create externally with Microsoft Report Builder and uploaded into the Source environment.
Extended ClientTrack Database Objects including:
- Table structures and/or columns prefaced with “CT_” or “CUSTOM_”
- Store procedures prefaced with “C_” or “dnn_” or “aspnet_”
- Database functions prefaced with “C_”
- Database views that start with “CUSTOM_” or “qview_”, with “qview_” only being used for views created from a query (i.e. qview_1000000123)
XML and CSV Import and Export Definitions
Scheduled Asynchronous Task configurations
ClientTrack Portal configurations including the setup of a particular Blog or Forum (blog entries and forum posts are not transferred in a Sync).
Additional System Access options from User Management (Individual User's Permissions that Additional System Access will not Sync).
|
Due to ClientTrack's server processes, RDL Files may take up to two hours before appearing for Users after a Sync. Users should always stick to "c_" format in their Procedure names and use the following naming conventions:
|
Configurations Not Copied During a Sync
Configurations Not Copied During a Sync
For all of the following items, none of the configuration objects are removed/replaced from the Destination environment during a Sync.
Client Data
Transactional Data including Services, Assessments, Client Files, Family Members, and all other data related to specific Clients.
Setup Data including Organizations, Programs/Projects, Service Codes, Grants/Funding Sources, Housing Facilities, Providers, Employers, Document Checklists, Items, Evaluation Codes, and Surveys (if applicable). See Configurations that Conditionally Sync for Setup Data Code Lists (not Evaluation Codes).
- If the setup data is not consistent between the Source and Destination environment it will prohibit effective end-to-end testing. Following strict adherence to the setup data creation in Source and then Destination will guarantee the configuration behaviors in the Source environment will persist ahead of the sync process to the Destination.
Issues from Issue Tracking
Data Explorer Questions
Organizational News
User Accounts
Series, Events, and Occurrences
Other System Codes (Financial/Country Codes)
Configurations That Conditionally Sync
Configurations That Conditionally Sync
Three configurations in ClientTrack Sync conditionally depending on the environment they were created in:
1. The Codes Table
The Codes table (not to be confused with Evaluation Codes) will Sync, including each Codes' OrgGroupID.
If you create a Code in the Source environment marked as "All Organizations", it saves in the OrgGroupID table with the value of "-1" and will Sync as expected.
If Users only have specific Organizations selected to have access to a specific Code, after the Syn, the Code will not retain those Organization Access configurations due to the OrgGroupIDs being associated with different values in different environments.
If a User needs to have a Code be accessed by specific Organizations, create it in the Destination environment only or change the configurations post-Sync. Records in the Codes table that had been created in the Destination environment will not be removed by a Sync.
2. Eligibility Rule Sets
3. Queries designed in ClientTrack Query Designer
If the query logic is no longer valid due to changes in your database schema the sync process will communicate a warning to the Engineer conducting the sync. The Engineer will communicate any queries that are no longer valid at the close of the configuration sync. The query will still be visible within ClientTrack but will not query against the database until the query logic has been updated.
A similar process is happening with the tables associated with Query Designer and the Eligibility Rule-Sets. When a User creates a Query in the Production (PROD) environment, those Queries will all start with a 2000000000 number and because it is not in initial Sync ID number range, will be left alone during a Sync.
|
1000000000 ID Queries made in Training (TRAIN) are not editable in Production (PROD) environments.
When a Production (PROD) environment is copied to create/replace a Training (TRAIN) environment, the 2000000000 ID records will be deleted and the environment will be reset to have new records created with a 1000000000 ID. Users with 2000000000 ID Queries that exist only in the Production (PROD) environment only at that point, will need to recreate or export/import the Queries into the newly created Training (TRAIN) environment, if necessary. |
Workgroup Name Changes and Deletions Prior to a Sync
Workgroup Name Changes and Deletions Prior to a Sync
When Workgroups need to be deleted or have a name change, it should be done only in the Source environment and those Workgroups will still need to be mapped to a Workgroup in the Destination environment during the next Sync.
When requesting a Sync, these mappings will need to be provided to your Eccovia contact at the same time as the Sync is requested. This is due to a built-in functionality in the Syncs designed to not to have User Accounts accidentally be caught in limbo with no Workgroup (and therefore unable to login) after a Sync.
When deleting a Workgroup, ensure all users are removed from the deleted Workgroup. When scheduling your configuration sync your Client Success Manager will verify there are no unmapped workgroups. It is important to note that if you make any workgroup changes once the configuration sync has been scheduled you will need to inform your Client Success Manager to allow another validation of workgroups between Source and Destination.
Database User Mappings During a Sync
Database User Mappings During a Sync
The ClientTrack Sync process includes special provisions for user mappings that aims to reconcile differences in user IDs when synchronizing queries and other configuration items that reference users.
As an example, if a user creates a new query in an implementation / training environment and marks the query as Runnable or Editable by only themselves, the ClientTrack Sync process will identify whether the same user exists in the production database based upon the user’s user name.
If the user does exist in the production database, the query will be appropriately associated with that user. If the user does not exist in the production database, the query will be assigned to a generic, system-generated user called “Missing Training User.”
A ClientTrack Sync also syncs checkout histories related to configuration items such as forms, workflows, and dashboards. User reconciliation during ClientTrack Sync applies to users associated with queries, form checkout histories, dashboard checkout histories, workflow checkout histories, and users associated with eligibility rulesets.
Important Considerations When Performing a Sync to Production
Important Considerations When Performing a Sync to Production
At times, Configuration Syncs to production interfere with Change Data Capture (CDC) and Replication Sync services. Specific steps need to be taken to manage CDC services in conjunction with a Configuration Sync to ensure CDC services continue to run successfully following the sync. Similarly, Configuration Syncs can also interfere with Replication Syncs.
After a Configuration Sync completes, certain tables associated with Replication Syncs may need to be both re-created and repopulated with historical data. For these reasons, Configuration Syncs to production must be performed by Eccovia’s Engineering Department and scheduled according to Eccovia’s Change Management Policy.
Important Considerations When Overwriting a Non-Production Database with a Copy of Production
Important Considerations When Overwriting a Non-Production Database with a Copy of Production
Under special circumstances, non-Production databases will be overwritten by a copy of Production. This is generally done for testing purposes only. This is not a sync operation, but it is covered in this document to differentiate this process from a sync. Overwriting a non-Production database with a copy of Production will harmonize the setup data between environments but there are other important implications to consider.
- Any development in process in the overwritten destination inclusive of optional Portal configurations will be removed
- Support issues will be lost in the overwritten destination
- Misalignment of the support numbering system in overwritten destination
- Increased database size of the overwritten destination
- Live Client data is now in a training environment. Extra caution needs to be taken to ensure Client data is not being shared or discussed during the training process
- Client transactional data should be removed but will vacate any testing data.
- The Eccovia Support team may log into your training environment for issue resolution
- Users with access to a training environment can have different user permissions than in production. Ensure the users do not have additional security settings giving them access to data they would not have in Production
- Generated test/sample data will be lost
APPENDIX: TOOL ACCESS PERMISSIONS
Appendix: Tool Access Permissions
The following table describes each Tool Access Permission that is available and identifies specific capabilities granted to Users as a result of this permission. In all cases, Write permissions also include all abilities granted by Read permissions. Permission that allow Users to make configurations to their ClientTrack environments are only given after proper training has been sought. A User cannot give another User Permissions that they themselves don’t have.
|
Important Security Notice Items outlined in orange are “elevated privileges.” If a User is granted one of these permissions, they could potentially elevate their own privileges to access additional privileges and/or access data the User’s security settings restrict them from accessing.. System Administrators should exercise extreme caution in assigning these. |
Forms
Tool/Capability |
Read |
Write |
|
Delete Records/Recycle Bin |
User can access the recycle bin on Forms that have delete buttons. User can view deleted items |
User can access the recycle bin on Forms that have delete buttons. User can view and restore deleted items |
| Drop-down List | User can view the contents of drop-down list definitions and items |
User can edit and delete dropdown list items for custom drop-down lists |
| Form Designer |
User can access Form Checkout and Form Designer, view how a Form is designed, including all properties, elements, data definitions, audit information and rules on the Form |
User has full capabilities to edit any aspect of custom Forms including Form rules, elements, and data definitions. User can also create entirely new Forms and copy and configure existing Forms |
| Form Overlay | User can view the setup for a Form Overlay | User can create and apply Form Overlays for Workgroups they can access |
ClientTrack IDEA (Integrated Data Exploration and Analysis)
| Data Explorer | User can view and run Data Explorer questions |
User can create new Data Explorer questions and edit questions that they have edit rights for (based upon question properties) |
| Domain Designer | User can access Domain Designer, view the setup of existing domains and their relationships |
User can create new Data Domains, edit the setup of existing custom domains, apply domain visibility to their Workgroup, change the way in which domains relate, and copy and customize existing domains |
| Query Designer | User can access Query Designer and queries that they have access to. For those queries, user can review the results of a query including SQL statements, and provide parameters, if applicable; user cannot edit the setup of those queries or create new queries |
User can create new Query Designer queries, edit queries that they have edit rights for (based upon query properties, and copy and export queries that they have read rights for |
| Report Designer | User can access Report Designer and reports that they have access to. For those reports, user can preview the results of a report, and provide parameters to the report, if applicable; user cannot edit the setup of those reports or create new reports |
User can create new Report Designer reports, edit custom reports, and copy existing reports |
Import/Export
| Data Export | N/A | User can access tools that are designed specifically for data export including XML exports, and “Whole Database Export” |
| Data Import | N/A |
User can access tools in ClientTrack that are designed specifically for importing data including XML imports and CSV imports |
| System Integration |
User can access advanced system integration configuration features (e.g., the ability to view outbound integration API keys or to view inbound API access keys) |
User can access advanced system integration configuration features (e.g., the ability to manage outbound integration API keys or to manage inbound API access keys) |
Miscellaneous
| Calendar Designer |
User can access the Calendar Designer and review the configuration of calendars applied to the Workgroups that the user can access |
User can change the configuration of calendars applied to the Workgroups that the user can access; the user can add, change, or remove task pad options and schedule options |
| Case Note Templates | User can view the setup of case note templates | User can edit existing case note templates, create new templates, and identify which organizations can access each template |
| Data Warehouse |
User can access Data Warehouse Designer and view the setup of existing configurations |
User can edit existing configurations and create new data warehouse configurations |
| Elevated API | N/A |
User can execute API methods that require elevated access, such as methods that can execute stored procedures |
| Eligibility Designer |
User can access the Eligibility Designer and view the setup of existing eligibility rulesets and their related rules |
User can edit existing eligibility rulesets and related rules and create new rulesets |
| Housing Designer |
User can access the housing Designer and view the setup of existing facilities, rooms, and beds based on their access |
User can edit properties of facilities, rooms, and beds based on their access; user can also create new facilities, rooms, and beds |
| Password Changes | N/A | User can change the password of any user that is in the entire system |
|
Password Changes in Organization |
N/A |
User can change the password of any user that is directly related to an organization that they have edit rights to |
| Portal Designer | User can access the Portal Designer and view the setup of the existing portal pages | User can edit the configuration or existing portal pages and create new pages within the portal |
| Security Access Control | N/A |
User can control whether the security model is enforced when creating or editing forms in Form Designer or creating or editing queries in Query Designer |
|
Setup Data Management |
User can view system setup data such as organizations, program, service codes, evaluation codes, etc. | User can edit and add setup data |
| User Setup |
User can view system users and identify which Workgroups and Organizations to which each user belongs |
User can edit existing users, add new users, and update which Workgroups and Organizations each user is able to access |
| Workflow Designer |
User can Workflows to view Workflow properties, step properties, related rules and actions |
User can edit custom Workflows, add new Workflows, or copy and configure existing Workflows |
Workgroup
| Dashboard Designer | User can the view custom Dashboards. |
User can edit custom Dashboards, add new Dashboards, and change the configuration of forms and queries available in each Dashboard |
|
Dashboard Personalization |
N/A | User can personalize their own Dashboards by selecting from pre-existing Dashboard parts that are available for their assigned Dashboard |
| Workgroup Designer |
User can access a Form Checkout Dialog where they can view what forms/dashboards are used in each User with Read Only Workgroup Designer can not access any workgroup in Design mode |
User can edit custom Workgroups, Menu Groups, and Menu Options; user can create new Workgroups. Note: editing Menu Groups and Menu Options may impact multiple Workgroups |
